
Review : VegaTrem VT2 Vibrato and More…

The VT-2 installed and balanced
This time I want to take you through a recent upgrade project on a Limited Edition Fender Telecaster. I was inspired to do this by Philip McKnight of Know Your Gear, and his superb Sharpen My Axe series. A big part of this upgrade is the bridge change from the stock Fender USA bridge to the new VegaTrem VT2 Vibrato Bridge System for Telecasters. It is AWESOME, and to learn my entire upgrade process let’s get going.
First Step
I had recently installed a VegaTrem VT-1 bridge and vibrato system on one of my Stratocasters. It is absolutely brilliant, certainly the best Stratocaster vibrato system that I have ever used. This convinced me in short order to try one of the VegaTrem VT-2 vibrato systems for a Telecaster, so I went through the guitar room to pick a Telecaster. I chose this three year old American Telecaster Limited Edition. The top and headstock are done in the classic California seamfoam green under a gloss coat and the sides and back are bright white under the same gloss. It is a semi-hollow body and has pretty darn good sounding pickups and electronics. It has a satin finished maple neck and an ebony fingerboard that is extremely comfortable to play. So I had found the guitar to do the VegaTrem VT-2 upgrade on.
Second Step
I had to get a VT-2. I reached out to Charles Cote at Electric Mojo Guitars, a highly trusted independent shop and asked for his assistance in getting a VT-2. Charles stepped right up and got the order placed with VegaTrem. For those who do not know, VegaTrem is a fairly small manufacturer based in Spain building very focuses and superb quality products with a team of super people. My communication with them as always been perfectly positive and their English is so many light years better than the disaster known as my attempts at Spanish. VT-2 on the way.
Third Step

Graph Tech String Tree
I wanted to replace the Fender string tree that was on the guitar. It was much better than those cheap stamped metal things dating from 1949, but still could cause binding so I bought a Tusq XL string tree from Graph Tech. Replacement took under two minutes. I recommend replacing the so-called vintage string trees on any guitars that have them but especially on any guitar that has a vibrato system on it (aka tremolo arm).
Fourth Step
As I was already working at the headstock I decided to replace the Fender factory tuners with Graph Tech Ratio locking tuners. Ratio tuners have different gearing to better support different string gauges. They are more expensive than other locking tuners, but to me, the difference is worth it. They also come with a series of adapter plates, in case there are tuner screw holes in place to hold the stock tuners. The plates are unpolished aluminum but you can buy chrome, nickel, gold or black plates if you prefer. To my chagrin and surprise the Fender tuners did not use the more common pinhole layouts so I had to install the ratio tuners, align them using a straight edge and then use an awl to create a depression to keep the drill bit centred. I put a piece of painter’s tape around the bit to prevent me drilling too deep for the mounting screw. The process took less than a minute per tuner and they were mounted in short order.

The tremendous Graph Tech Ratio Tuners - you can see that they are numbered for each string that they are built for
Fifth Step
Before moving to the fingerboard and the frets, I wanted to check the nut. With the old strings off, I cut short lengths and ran each string through the proper nut slot and confirmed that the slots were not binding and prior to removing the strings, I checked to confirm that the nut slot depths were cut correctly for the 10-46 strings that were on the guitar. The nut as best as I can tell is bone. So I cleaned out the slots using a fine nylon tool and then applied the Music Nomad nut lube to the slots, wiped the excess end then used the old strings to ensure that the lube had gotten everywhere after using the tool that came with the nut lube to apply it.
Sixth Step
I masked off the pickups and then checked the neck for straightness. With no strings, it was properly level. Then I used a metal fretboard protector with a snug fit on each fret and polished each one with #0000 steel wool. This is super fine and leaves no marks, but does take a bit more effort than the #000 that is typically recommended. I choose a bit more work instead of risk. The frets did not project beyond the fretboard, otherwise I would have used a Stewmac Fret End file to address that.
Using a fretboard guard to protect the fretboard while polishing the frets. This one is from Music Nomad

Monty’s Instrument Food - my personal favourite!
Once the frets were polished, I sprayed some diluted Murphy’s Oil Soap on a clean micro-fibre cloth and scrubbed away at the fretboard. The first cleaning came away with the cloth dark brown, not from dirt and oils, just dye that did not fully embed. Many makers use dyes on fretboards to colour the woods and this particularly true on ebony boards because most real ebony is never completely black. If you like the look of a dyed board, use a different oil based cleaner like the Music Nomad F-One, or the Dunlop Fretboard cleaner and don’t rub as hard as I do. A lemon oil can also work as a great cleaner, but many people use it as a fretboard conditioner not realizing that the citric acid in lemon oil actually dries out the fretboard rather than conditioning it. The Murphy’s Oil Soap is available in a spray bottle for under $10 for 750ml and does a great job, just be sure to wipe away all the residue. Unlike other oil based cleaners it does not leave a shine. Which brings me to my final fretboard step. I applied a generous coat of Monty’s Instrument Food and let it sit for about 10 minutes and then buffed it off. This is a superb conditioning wax that leaves the fretboard smooth and slidey without being greasy in any way, an issue I have with most fretboard conditioners. If you don’t want to order the Monty’s product from the UK, the Taylor Fretboard Conditioner available readily is my second choice. It is a thicker gel. Rub it into the fretboard with your fingertip, let it sit and then buff off. It is an excellent product.
Seventh Step
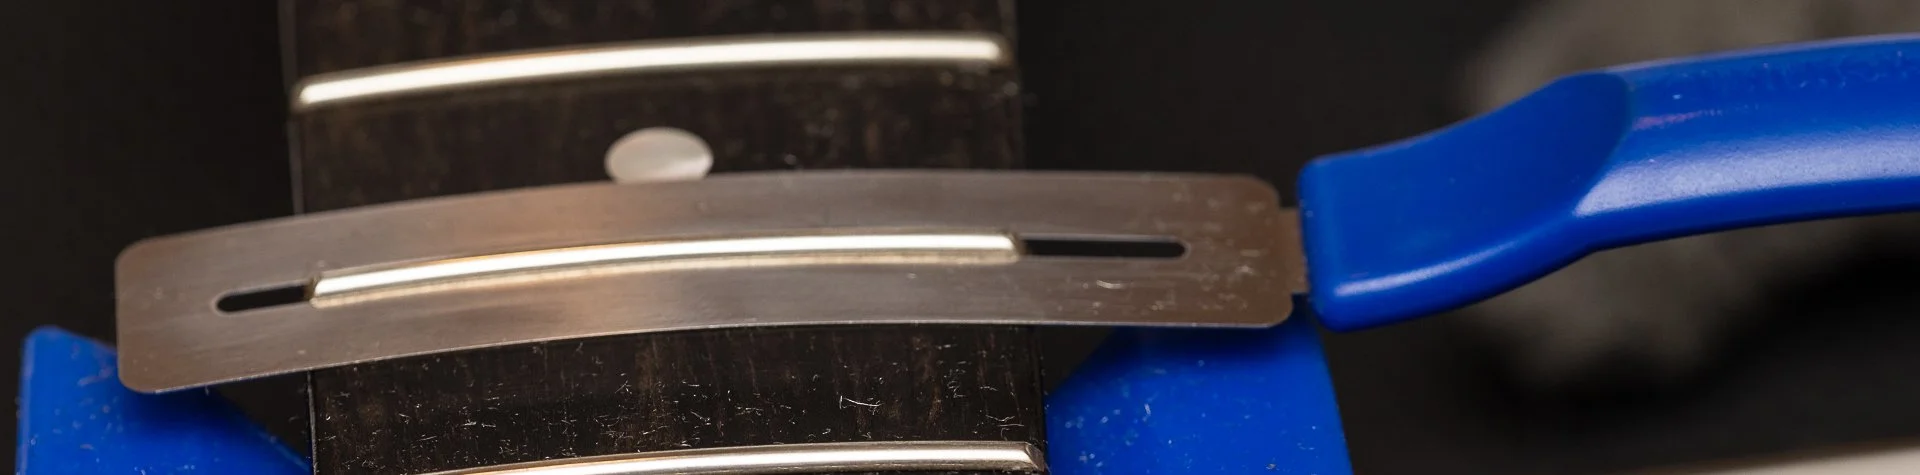
As I was not replacing the factory pickups or electronics in this project it was time to move the instigator of the work, installing the VegaTrem VT-2. I already had the strings off, so I removed the screws holding the bridge assembly to the guitar. I then removed the screws holding the bridge pickup in place, saving them and the spacers. I then polished and waxed the guitar top where the bridge plate had been to ensure a clean mounting surface for the VT-2. The VT-2, like the VT-1 is a two piece arrangement. The vibrato portion is independent of the knife edge anchor plate. You have to knock out the factory string ferrules on the back and this took me a while to find a rod of the proper diameter to put into the string hole that would catch the inner lip of the ferrule without digging into the sides of the hole. I quick tap on the end of the rod with a soft head hammer and the ferrules popped up perfectly. With some instruments, you might want to score using a sharp point X-Acto around the ferrule edges in case the finish was applied AFTER the ferrules were put in place. This is quite common in low price instruments and you do not want to be tearing a chunk out of a thick polyester finish.

VT-2 Individual spring tension nuts in existing body ferrule reliefs
Once the ferrules were out, it was very easy to mount the vibrato portion to the body. There is a spring assembly that goes into each existing string hole. Note that if your guitar is not a back loading style instrument, get a pro to do this install as it will mean drilling long holes in the body. This means that the new system loads strings through the end of the bridge portion, what folks often call a top loader. The spring posts extend into the holes and to each you thread on the supplied nut that will sit neatly in the existing ferrule hole when you are done. I say to you right now that the mounting system is incredibly elegant and straightforward. Tighten these up right now so the vibrato plate sits solid against the guitar top. This is very important.
Then you place the knife edge anchor plate against the vibrato portion and hold it tight against it. Use a marker to note where you will have to drill two holes for the anchor plate. This is the only part of the install that is not drop in. It is the only modification made by the installation. Very minor indeed. No routing and none of the cavernous openings required by a Bigsby. Be cautious in making your marks to be the centre of the hole. If you will drill with the anchor plate in place, I strongly recommend using a self centering bit. I used a self-centering 1/16 bit, and had marked the bit with a black sharpie so I would know when to stop. Prior to drilling I used my sharp pointed awl to poke a divot in the mark as a guide for the drill. If you would prefer not to use a self centering bit, no worries. Use an awl to create the divot to centre the drill bit and if you can use a brad point bit, which cuts a much cleaner hole edge than a standard drill bit. I had both the self-centering bits and brad point bits on hand from my very amateur woodworking hobby but neither are expensive and you will find plenty of other uses for either. If you ever have to drill holes to mount hinge plates, get a set of self-centering bits and you will be very happy indeed.
With the holes drilled, I mounted the anchor plate using the supplied screws and confirmed everything looked right. VegaTrem has an excellent installation video on their site and if you do not take the time to watch it, you are making an error.

VT-2 Side Angle
Eight Step
I checked the saddles for any potential for binding and applied a bit of nut lube to each saddle as I always do on every string change. I then pulled a set of my Curt Mangan balanced tension 9.5-44 coated strings from the drawer. I worked using a tension chart and the company’s superb custom string tool a couple of years back to build my own signature sets of strings. I find no loss in tone from their coating method, and a much better lifetime than uncoated strings. Your mileage on coated strings will depend upon your own physiology. Stringing up the guitar and going through my usual stretching routine (a very tedious but functional series of stretches pinning each string at each fret and then applying some tension) worked fine. I tuned to pitch on install and really appreciated the fast and efficient locking mechanism in the Graph Tech Ratio tuners as well as how effective tuning was with the different ratio gearing for each string.
Ninth Step
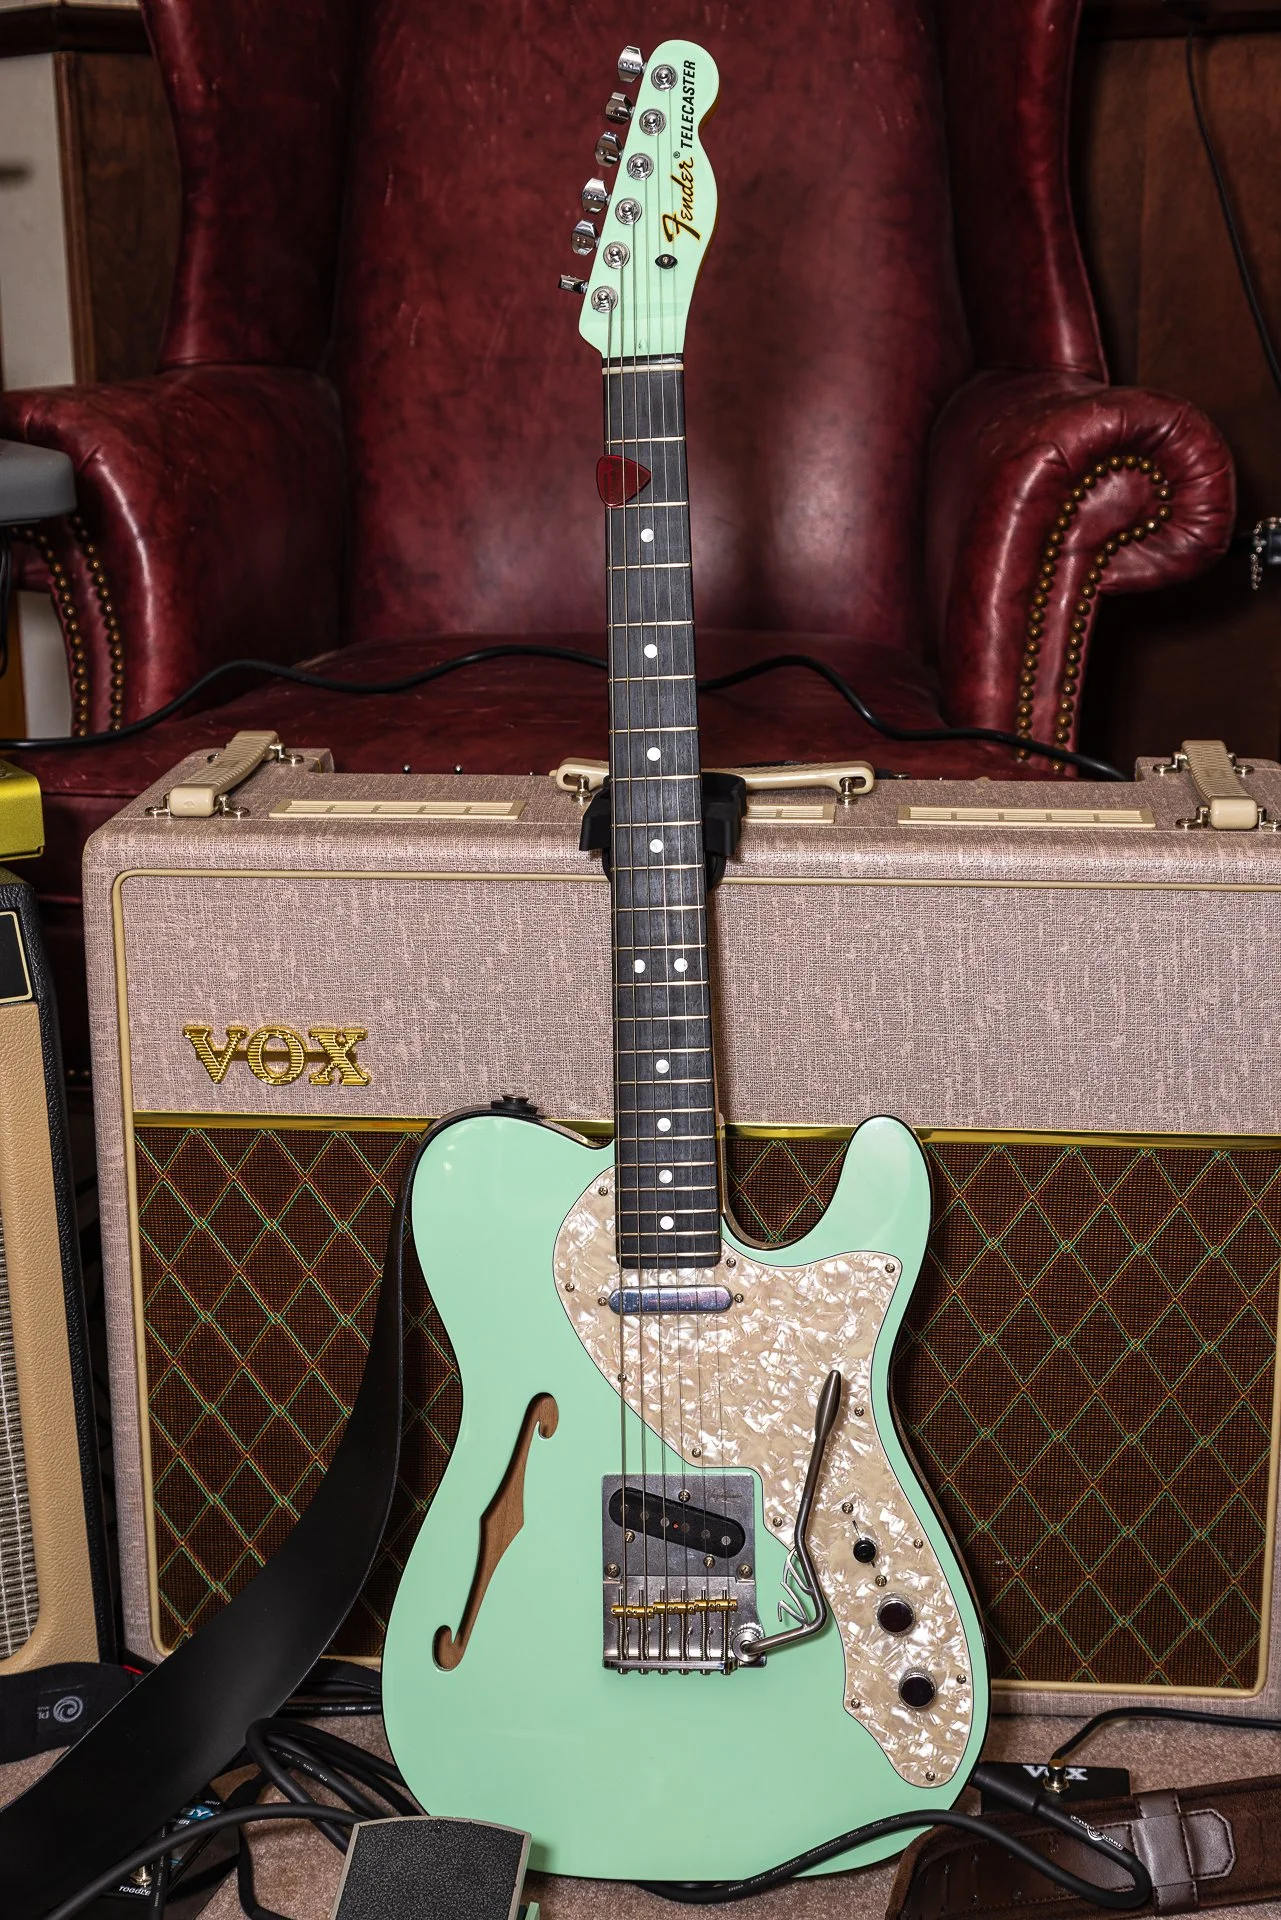
The finished guitar
Time now to try out the vibrato. It worked but was really stiff, like a Bigsby with the short spring. I sent an email off to VegaTrem who responded quickly given our six hour time zone difference. Being somewhat unable to walk away from a problem, I discovered that by loosening off each locking nut in each ferrule equally, I was able to get a nice balance between vibrato arm tension and the vibrato plate now sits floating about ⅛ of an inch above the body. I can press down on the arm, which is still much stiffer than a Strat arm, very much now like a Bigsby with the medium spring, and also do slight pull ups as well. On release, stretched strings return to tune perfectly, just as I found with the VT-1 on the Stratocaster.
Tenth Step
Time to check the live playability. Plugged it direct into my little Tonemaster Gremlin in the clean channel. The Gremlin is a really simple all tube design and the preamp can be pushed pretty easily. This means that the volume control on the guitar really makes a difference. The Gremlin also has a built in Iron Man II attenuator so you can turn the volume up on the amp, while increasing the attenuation to get the amp tone that you want, without summoning the police. The Gremlin is a 5 watt all tube amp. In these days of digital amps, we can easily forget just how loud 5 watts of tube power can be when combined with an efficient speaker.
Despite the now two piece bridge, I get more sustain than I did from the stock bridge and its stock brass saddles. I really love this Telecaster because it has fabulous body resonance and nothing was lost with the new VT-2 and in my opinion it sounds better to me.
After my playing session, I wiped down the strings with clean dry micro fibre cloth and then gave the guitar a good polish with Jim Dunlop Platinum Guitar Polish. Then it was time for the final photography.
What’s Next?
As I have noted, the factory pickups sound good and the pots are decent, but I think those components can be improved. So I will be reaching out to Tim Mills of Bare Knuckle Pickups for a replacement set of low wind pickups and a new set of audio taper pots and a better capacitor. My experience with Tim is that he looks at the challenge as a whole, taking into account the likely amplifiers, the music that I gravitate to playing and what I find missing from the factory pickups. As it stands, as good as they are, I don’t like the linear falloff in the pots, I think it needs a proper treble bleed for low settings on the volume control and I would like more definition for each note when played in a clean amp. The Gremlin is an excellent test amp, but I found the guitar as it is best in either my Blackface Twin Reverb or the Blonde Tonemaster Deluxe Reverb which has a Celestion Creamback, which is probably my favourite all around speaker.
Conclusions
I fully understand that not every Telecaster player will want a vibrato option. However for those who do, this is light years better than a factory installed Bigsby and even more better than the cheap outsourced licensed by Bigsby stuff. There is a lot less whang capability than on a Stratocaster, but the warble you do get once you have tuned the tension level as I described sounds beautiful. There is no spring twang and tuning stability is superb. If you want a vibrato system on a Telecaster, in my experience there is no better choice than the VegaTrem VT-2. Ask me how I know :)
I chose to use the version with the VT logo as part of the arm. I was a bit concerned that I would catch my hand on the metal logo. Never happens. The arm is positioned so ideally, I can pick with the thumb and forefinger or use a pick and my middle or ring finger fall perfectly on the arm. This product is plainly the result of great engineering by people who understand the needs and wants of guitar players. It was obviously designed for players first, with the engineering empowered to make that a brilliant experience.
As I said with the VT-1, these are the best vibrato systems that I have ever used. Highly recommended.
Thank you all for reading and special thank to Charles Cote at Electric Mojo Guitars for his work in coordinating everything with VegaTrem. If you have not shopped with Electric Mojo Guitars, it’s worth your while to have a look. Great service, fast delivery, excellent stock management. Additional thanks to all the great people at VegaTrem for making such awesome products that allow us to expand our creativity. Until next time, peace.