
Review : Yamaha THR 30II Wireless Amplifier
Yamaha calls the THR series the "third amp", and I have to agree. It's not your gigging amp and it probably is not your studio amp. The product is designed to look decent in any home location, is unobtrusive and is built to deliver good tone at low volume.
I have had mine for a couple of months. I put it in my Living room as a place to play when on a short break from work, or before dinner with minimal setup. I made a mistake in this regard, as I wanted to play at louder volume in these periods in a room that was a bit too big for the amp. This is my opinion of course, so let it be said that your mileage may vary.
Things changed when I put my Helix and a pair of FRFR speakers in the living room and moved the THR 30II to my bedroom specifically for playing at low volume. I do not sleep through the night and am up at least twice a night for at least half an hour each time. Since making the THR II 30 available for this use case, I have changed my mind about the amp entirely.
The THR 30II is a digital amplifier. The series II family combines the three different colour offerings of the series I into a single amp. This is awesome as the series I always felt to me like a bit of pocket picking.
Yamaha touts the unit has having fifteen guitar amp models, three base amp models, three mic models to use with acoustics and a perfectly flat model for use with anything else.
The amp has three amp families, Modern, Classic and Boutique. Each family has a variety of default tone presets available by rotary switch. You use the same switch to access the bass and acoustic models. Yamaha does not document which amps each setting is modelling. GRRR. The Reference manual, which you have to download contains some hints, but clarity would be good.
The 30II Wireless is the top of the family lineup. It is rated at 30 watts output, has bluetooth connectivity to the excellent smartphone app, has line outs for recording to your interface, as well as USB direct outs. The unit includes a rechargeable LiION battery, ideal for playing where there is no AC power. The sound which comes from Yamaha's audio division called Extended Stereo Technology produces amazingly good sound from the very small drivers needed in a package this size. If you recall the old Apple HiFi, it's about that size, and delivers a very similar tonal range, which in my opinion, is excellent. The Wireless includes a built in Line6 receiver. Yamaha owns Line6 and the built-in effects are from the Line6 pantheon.
My only complaint is with the availability or more correctly, inavailability of the matching and optional Line6 transmitter. Apparently there are issues and my six week wait is going to be another six weeks or so.
The built in presets are what I would consider average starting places. I cannot say that I liked any of them out of the box. They do make a decent place to start and the iOS version of the app makes editing them a breeze and offers more functional variability than the on device knobs, particularly when it comes to effects. For example, the app let's me have delay and reverb at the same time, whereas with the knob it is one or the other. I confess that since I got the unit paired to my smartphone, I have only rarely touched the knobs on the unit at all.
There is a built in tuner that uses the same display as the battery gauge which is quite handy, although I would prefer that it be on the front panel instead of the top as when placed on a shelf as shown in much of the marketing material, the tuner is very hard to see. It's not a particularly sophisticated tuner but does the job. For greater ease of use, drop $25 on a Snark and move on.
Top deck of the THR 30II Wireless
In addition to the amp models, you also have cabinet simulations available. These include:
[table id=1 /]
I have to confess that I find Yamaha's reticence to say what cabinets they are trying to emulate annoying. I understand that doing so might cost them some money or require legal paperwork but they could do a better job of naming that would make the mental alignment easier. Line6 does this reasonably well and Yamaha owns Line6
In addition to the amp and cabinet modelling there are built in effects from the Line 6 pantheon. To gain access to all of them, you need to be using the THR Remote app on your smart device. The compressor and noise gate are only available this way. The Gate works fine, the Compressor is ok, but regular readers know that I am a compressor dork and this one is VERY basic. No 1176 here. Modulation effects include Chorus, Flanger, Phaser and Tremolo. They sound decent, although not high end and are more than adequate for the use case that the THR 30II is designed for. The onboard Echo offers up to 100ms of delay and tap tempo, plus basic EQ for the delay signal as well as a mix control. I found that setting it to a slapback level very effective to give some spacing in a small room. The reverb has four options (two via the knobs) including Spring, Room, Hall and Plate. Not studio grade reverbs, but more than sufficient for the use cases.
In addition to the user configurable options and five user memory positions, the THR II includes a number of factory presets. These presets are not just amp models, but configurations of amp and cabinet models along with effects configurations. They vary from very good to whatever, entirely dependent on your own preferences.
Screenshot from the Mac THR II Remote app, in this case showing the preset called EarlyVH
While I have used the amp mostly for electrics, I recently did a full bring back to life on an old Yamaha APX5 nylon string. I plugged it in and found a couple of settings that worked very well for it. I then tried my old Gibson Hummingbird that has a Fishman saddle pickup installed and it too sounded really nice. The Hummingbird is punchy unamplified so I would not do this at 2am while the family is asleep. I also have an ESP LTD 6 string bass. While I initially did not love this bass, I did a full set up on it on the afternoon of Christmas day and that made the necessary changes to make it a pleasure to play. Plugging it into the THR 30II Wireless sounded great, although I had to make my own preset for it as none of the factory ones delivered the tone that I wanted. In fairness, those presets were probably built for a four string bass, not the extended range of the six string. In reading the documentation, by using the Special amp model and some tweaking, the unit is purported to be a good choice for low volume practice with extended range guitars. I have not played my Strandberg 8 string through it, but I certainly will be.
And that, I think is the point. If you use the THR II family as I think intended by the engineers and less so by some of the marketing statements, you are likely to be very happy with the unit. In my first use situation, it was the wrong tool. Where it sits now, on a small table in my bedroom, it is tremendous.
Quick Look : Fender Tone Master Amplifiers
When it comes to that classic California clean sound, with near endless headroom, many players look to the classic Fender blackface Twin Reverb or blackface Deluxe Reverb. I will not get into the differences between a blackface and a silver face because it's Christmas time and I don't want to be starting any fights.
I love my Fender Twin Reverb. It sounds great. It sounds great right where it is, because moving it is an effort. The thing is heavy. The combination of the case, the Jensen speakers, and those power transformers all add weight. While players have been kicking these things around for decades, I do worry about damage to the spring tank or the tubes.
But what if, you could get an amp that a) costs less b) looks near identical to the original and that c) sounds damn close to the original? Would that be worth your time to look? For a reasonable player, the answer is yes.
Now, I've already heard the whinging about how the Tone Masters don't sound like a "real" amp because they don't have tubes and "tube warmth". The Tone Master is not identical to a Fender blackface tube amplifier, but it is very very close and unless you are A/Bing two amps side by side in a proper studio setting, I would challenge anyone to pass a blindfold test and identify which is which while specifically stating why that is so.
Thus, consideration of a Tone Master requires a certain openness of mind as well as the acceptance that it will cost less, be lighter and not have tubes or a spring tank. Perhaps it is the tone that might matter more to you.
Love those tilt back legs
Unlike other digital modelling amps, the Tone Master amps do only one model. The amp that they are trying to sound like. Thus a Tone Master Deluxe Reverb is designed to sound as close as possible to a Fender Deluxe Reverb. It does so through some excellent engineering using solid state technology, some quite incredible digital modelling and innovative approaches.
Instead of being 22 watt tube amp, it is a 100 watt D class power amp with a digital preamp. That doesn't mean it is louder. It is the reality that tube amps of a given power rating can be a LOT louder than a solid state amp with the same power rating. Power is not volume.
If you've ever played a Fender tube amp, and have cranked it to get that wonderful tone, you've also noticed that they are really, really loud. Nice for you, not so much for family, neighbours and potentially the local constabulary. The Tone Masters have selectable output controls that, in my opinion, do a very fine job of giving you the tone of a cranked amp at much lower volumes. Take into account the science of Fletcher-Munson and you will understand why lower volumes do sound different from higher volumes, and also understand that Fender has tried to address this as they reduce output. Perfect? No, but still really really good.
If I turn my Twin Reverb all the way up, the volume is untenable. If I turn up the Tone Master Twin Reverb all the way up, it's too loud, but then I can turn down the output via the rotary switch on the back while retaining the tone and reducing the volume. Bedroom players, and players who must live with other people and neighbours rejoice!
I think that Fender have done a good job on the digital reverb implementation as well. It's not a spring tank, but play this amp in your local club and you could very well forget it's not real springs. That's the point. Get the sound you want, without crippling back pain, increased reliability and more flexibility.
Back of the Tone Master Twin Reverb
Do you record? Awesome, because both Tone Masters have DI out for recording to your computer. There is therefore of course, Impulse Response speaker emulation built in with a choice of cab sims. The amp is also firmware upgradeable by USB connection.
The speaker or speakers in the Twin are still Jensens. Instead of the old style, these are the new N-12K Neodymium design. This makes them lighter without compromising response and they couple very nicely to the Class D power amp.
The front panels are identical to reissue Deluxe Reverbs and Twin Reverbs. In fact, if you do not notice the small Tone Master plate on the grill cloth, you might not even realize that the new amps are Tone Masters. Fender is not hiding anything, but they have done a lovely job on the vintage look.
Yes Tone Masters are not sixties blackface Fenders. They are new. If you want a sixties feel blackface, you can still buy the reissues from Fender. You will pay more. You will have more to carry in terms of weight, and for that cost and extra weight, you may find the new indistinguishable from the reissue.
I've had opportunity to play through both Tone Masters. I am very impressed. Why not go to your proper guitar store and give them a try for yourself instead of just believing what someone else says? How bad could that be?
Cheers and play on.
Review : Martin RETRO Monel Strings
While I await the delivery of the Curt Mangan strings I wrote about recently, I was in my local guitar store The Arts Music Store, which is a very dangerous practice in my case and saw on sale a Martin D-35. I know this guitar reasonably well. It has been in the acoustic room for some time and as consequence, suffered the slings and arrows of outrageous test players. Meaning, she has a few life marks on her. Does this affect the tone? Not to me, but the strings on it, D'Addario somethings had reached the level of dead. As happens there was a bit of corrosion on the frets, and the guitar has been handled a lot. I have always wanted a D-35, but not so much as to pay full pop for one. I am also not so disciplined as to put all my guitar dollars away until Black Friday sales events.
I told the Manager, that I was interested in the guitar and he agreed to let me try it out for a couple of days and if I was not happy could return it. I thanked him and they put it in a loaner case and also told me that they could have it restrung. Since I am rather picky, I asked to do that myself, since I knew I wanted to check the neck, and do a basic setup as well as polish the frets as well as clean and oil the fingerboard. I enjoy this kind of work, so with some Tony Rice playing in the background, got out my maintenance table and kit and went to work.
The strings that I selected were the Martin Retro Acoustic Monel series 12-54. They stretched in nicely and tuned up quickly and have held tune very well. As these are Monel wrapped steel (Nickel/Copper alloy) they are silver coloured instead of bronze coloured. As I mentioned in another post, Monel strings sound different than regular 80/2 or Phosphor Bronze strings. They are also naturally corrosion resistant, which is an important thing for me.
I have to admit, that initially I was not enthused. The D35 didn't have that powerful bottom end or upper midrange punch that I was used to with rosewood bodied, spruce topped bodies. The grain on the top is very widely spaced, suggesting Adirondack versus the documented Sitka spruce and there is plenty of top movement ability. As I sat and played however, I started to notice tones that I had never really heard before. The Monel strings reduce the impact of pick attack (I only fingerpick or use thick V-Picks) and are very neutral sounding. As a consequence, I hear a wider tonal palette, with more delicacy than I have in more traditional string choices. After several hours, I am looking forward to getting the Mangan strings that I ordered for my Gibson L4C arch top.
I am told that Monel strings handle amplification well. The D35 has no built in pickup, although if I buy it, I will install one at some point. The L4C has a Kent Armstrong pickup mounted to the end of the neck that I installed some years ago and once restrung, I will try that out through my acoustic amp rig.
The Monel strings feel different to the traditional strings as well. The high E and B are plain steel, but the rest are Monel wound strings. The guitar is not as loud as with the strings that were on it, but there is more clarity in the quieter tones. It took a bit of getting used to, but I am very impressed by these strings. I am not habitually a fan of Martin strings, but these are different. I do notice that my other acoustics, strung more traditionally, are louder and boomier. We will see what transpires, but I may end up transitioning my larger body acoustics to this different string structure. You might consider trying a set yourself.
Have a great day and keep on playing.
Acoustic String Considerations
I'm looking at what has been posted and I see that it is all related to electric guitars. Fair enough, but I also play acoustic and most of my peers do as well, some more than others of course.
As I have been studying and experimenting with electric guitar strings, I have also been doing so with strings for my acoustic guitars. This may be a larger area for discussion than even electric.
I had typically looked at acoustic strings as just being an enabler for the sound of the guitar, influenced by the woods used and the construction type. Most of the acoustic strings in the market are either Phosphor Bronze or 80/20 Bronze. Folks seeking a brighter acoustic tone would choose 80/20 and folks seeking a more mellow tone would choose Phosphor Bronze, presuming that they or the seller knew the difference. I have not completed any course of study when it comes to nylon strings so I'm leaving them out for the moment.
The major string makers typically offer many (too many?) choices in this regard, and then there is the choice over buying coated or uncoated strings. Like the tonal delivery, this is very much a personal decision. I prefer coated strings because they last longer with my skin oils in most cases. All my Taylor guitars came equipped with Elixir strings, a popular brand of coated strings, and while they are very popular, they do not work for me. Elixir has done a great job of education on the value proposition of coated strings and I appreciate this. In my experience, I get a fuzzy something on the strings. I am honestly not sure whether the strings use the Polyweb or Nanoweb coating so I have been looking elsewhere. Coatings have an impact on tone an on string feel.
In addition to the blend of phosphor and bronze, some strings incorporate materials other than steel in their construction. For example, the D'Addario Silk and Steel strings use a silver plated copper wind, interwound with silk that produces a very mellow tone because of the damping effect of the silk.
For a bit brighter sound while staying mellow, we encounter silver plated copper wraps without silk such as the D'Addario Gypsy Jazz sets. Still very mellow and like Silk and Steel, well suited to finger style players.
If you like playing slide on your acoustic guitar, you might consider flat top strings where the Phosphor Bronze wrap is polished to be smooth so you don't get those extraneous noises when using a slide. I wish that I had realized this years ago, because I am not accomplished at slide and I find the sound of the slide on regular wound strings to be ear-jarring. Slide is a whole other learning opportunity with all kinds of different slide materials available. Regardless of the slide construction, in my opinion, a smoother string sounds better to my ears.
The traditional Phosphor Bronze blend tends to fall in the middle between mellow and bright. This is likely why this blend is so popular and a good choice for guitarists who have not yet come to a specific string type for their use cases. They are available coated and uncoated from a variety of vendors.
Makers like Ernie Ball offer an Aluminum Bronze option which uses a special blend of Aluminum and Bronze that gives more bottom and top end. I have never tried them but if you find your acoustic sounds too midrange punchy, this may be a viable option for you.
D'Addario calls their Nickel Bronze their premium uncoated string. They fit between Phosphor Bronze and 80/20 Bronze on the brightness scale. Again, I have never tried them as I tend to stick to coated strings given my amazing ability to kill uncoated strings in no time at all.
Could these be Monel?
80/20 strings use an 80% copper and 20% zinc wrap and deliver a very bright tone. Some makers, Ernie Ball for instance, offer wound strings where the steel core is brass coated before the wrap is applied. Only you can determine whether this makes a difference for your desired tone, but know that if you want bright tones, 80/20 is the way to go.
Interestingly the popular 80/20 was only developed in the 1930s, by John D'Addario Sr and famed luthier John D'Angelico. Prior to that there was another construction type, one that is exhibiting a resurgence. This construction is called Monel.
As I started looking into Monel, I discovered that construction was not completely clear, with some vendors invoking the "secret sauce" story. Fortunately custom string maker Curt Mangan is very clear. Monel is a blend of materials, 67% nickel, 30% copper with the remainder made up of iron, manganese, carbon and silicon. Monel is not new. The data tells us that Monel existed earlier than the more common 80/20 and Phosphor Bronze string but was replaced because it was more expensive to build Monel strings. Martin Guitars offer Monel strings in their Retro line as do Curt Mangan and Rotosound. Curt Mangan also notes that Monel is sometimes known as Nickel Bronze, so those premium D'Addario strings mentioned earlier may actually be Monel.
On a side note, if you have not heard of Curt Mangan, you might want to go online and try his strings. His set for the Rickenbacker electric 12 string is the best that I have ever played.
Mangan's Monel strings are available on either a hex core or round core. I have not played either yet and could not tell you what a difference that makes. I have however, placed an order with the company and will know more once I get the strings. In addition to the acoustic strings, I also ordered a couple of sets of electric strings because I enjoy trying things out.
You may be wondering why I would go to an uncoated string like Monel's when I have already said that I can kill uncoated strings really quickly. Well the composition of the strings are naturally corrosion resistant. More expensive to make, but may last longer.
The other reason that I want to try Monel strings is that as you have gleaned so far, all strings we have discussed so far impart some colour to your guitar. Some minor research will reveal that different tone woods respond very differently as do different body styles. The story behind Monel is that they are the most colourless strings available, neutral rather than particularly warm or bright. I have guitars made with a variety of different tone woods and even with traditional strings, they sound different, and I am really super curious about what I will hear differently, if anything, by going with neutral strings that add no colour. Some folks have said that they do not like the sound of these strings while others love them. I will find out for myself and so can you.
Thanks for reading and play on.
First Look : Universal Audio OX
It doesn't look all that high tech. In fact, it looks kind of retro. Which has nothing to do whatsoever with what it does.
The OX Amp Top Box from Universal Audio is different things to different use cases. In this first look, the only thing that I will talk about is the use case to hear your amps the way that they were meant to be heard, without the involvement of angry neighbours or the local constabulary.
I ordered mine on Black Friday because I did not want the demo unit, which was missing its power supply. It arrived last week. I am very glad for having the opportunity to save money on the device, because, no kidding, inexpensive it is not.
I unpacked the unit and followed the simple instructions to connect to my Marshall Silver Jubilee 100w head and single 4x12 slant front cabinet. There are a zillion iterations of SJ reissues, mine has the basket weave front. In the 12+ years that I have owned it, it was never turned up past about 5.5 and even then that was for less than 10 seconds. It sounded glorious in the room. It sounded glorious the next street over. And therein lay the challenge. To get the amp working, it had to be turned up, and turning it up made it, in my environs, unusable to get its best tone.
I realized right away that the device did not come with a speaker cable to connect it to the head, so I had to run out to the local music store to buy one. I bought a few, because that's how things go for me. Connecting the unit up properly, I turned it on, along with the amp, leaving the amp in Standby. I had just had new 52 Vintage pickups installed in a MIJ 52 Tele so plugged that in. I turned the OX right down and strummed a chord. Nothing.
The rear panel is very simple. You would have to work to mess things up
Figuring I messed something up, I redid all the wiring, disconnected the G Major from the effects loop and tried again. Nothing. So I turned the OX up and lo and behold there was a sound. A very quiet sound. At this point, it occurred to me that the amp was set to it's typical volume between 1 and 2. With the OX on 4, I turned the amp up to 6 and there was tone!. So I turned it up to 8 and it was again, glorious. I could feel the air moving out of the cab, there was that visceral gut feel that you only get standing near a really powerful amp that is being pushed a bit.
I was in the clean channel and it was amazing, the Tele ringing like a bell. I mucked about with settings on the amp volume and gain, the Tele volume control and the OX until I was hearing what I think I remember a Tele sounded like through a Marshall at volume while still clean. I turned everything off and reconnected the G Major to get some nice delay going and to ensure that it wasn't going to be a tone soak. I found that I had to turn the output on the G Major up to match the out of loop levels and once that was done, the sound was again wonderful.
Stomp the foot switch to the high gain channel and hello world, that sounded like it should, with creamy overdrive but none of the shrieking pain that you sometimes get with a bridge pickup in a Tele through an overdrive pedal. Just wonderful tone. Go to the neck, and there was that expected smooth overdrive. The OX / amp combination respond beautifully to manipulation of the guitar's volume and tone.
I then switched out to an ES-Les Paul. Yes, that is the sound of a Les Paul through both a clean and a driven channel. It is an ES, that up until now, I've not been in love with. It was great having to move away from the amp because Mister Feedback showed up with his entire family when I was too close. Full Marshall tone, without the cops and the people with the torches and the pitchforks.
I have tried other vendor's tools to reduce the volume of high output amps. None of them come close to the clarity and tone of the OX.
Of course there is an entire different side to the OX, that being it's ability to provide cabinet and microphone simulations to the signal for connection to your DAW. It's USB and is very straightforward. There are lots of cabinet and mic choices with the latest software upgrade, that other reviews complained took a long time to arrive. They're here now.
I connected my Mac to the OX's built in WiFi and followed the instructions to connect it to my internal WiFi. It made the change and it just worked. The OX identified that there was a further update available so I clicked go ahead and all went very smoothly indeed. The OX app on the Mac and the iPad is for the recording side only, not for the load management portion. The app layout is lovely and very intuitive, so I will be back with a different look at the recording interface.
Thanks for reading
Stress Relief
Maybe you never get stressed out. Maybe every day is just perfect and nothing annoys or upsets you. That would be cool, but it's not me. And that's one way that playing guitar helps enormously.
Sometimes it's just the sound and mood that gets created that contributes. While big bodied jazz boxes are certainly not all the rage these days, there is a magic therein.
My ES-175D is from the early 90's. It took me a while to get in a groove with it. It's after all a "jazz" guitar and except for some chords and a short solo from Take 5, my jazz skills are near invisible. I've recently been spending more time with it since adding the Fender 65 Blackface Twin Reverb to my playing area.
The ES-175D is commonly referred to as an archtop. Gibson has done all manner of archtop guitars over the years. Mine is equipped with the stock humbuckers that came with the guitar in the early nineties. I love the sharp point on the florentine cutaway, and the big deep body has a lot of natural resonance. Held to the ear, its tone is warm and liquid.
I have the ES-175 strung with D'Addario Chromes. My setup is the 11-50 gauge set. Chromes, if you have never played them, are flat wounds and fall into the mellow category of strings.
My preferred mellow strings, the D'Addario Chromes
For some time I was not excited about the tone that I was getting from the guitar into my existing amps. It wasn't bad, certainly a better player could get better tone, but when I got the Twin Reverb, things changed for me and the guitar. Instead of fighting with the amp and guitar controls, I could just sit and play. There was the big airbox warmth and mellow ness, without losing all the spark of the bridge humbucker or the high strings with the neck humbucker. If ever an amp and a guitar went together, this pair seemed to be it.
THE amp to use with the ES-175
As regular readers will have noticed, I am a serious pedal geek and I wanted to see what I could do with minimal pedals. I limited myself to only two pedals for this exercise and am very happy with the results. Of course, I am using the fabulous reverb built into the amp, so that should probably count as one, but I don't count it. The only pedals are a TC Electronics Polytune 3 in stroboscopic mode and my fave Cali76 compressor.
My go to compressor on the Fender Twin
I have too many compressors. Diamonds, an Empress and a pair from Origin Systems, the Cali76 and the Stacked. I also like the basic compressor from Robert Keeley, but in all my testing, nothing pairs with the Fender Twin like the Cali76. It's just so good. It's compression without squishiness while delivering sustain for days, particularly in conjunction with a hollow body guitar.
Putting all the pieces together, I get this warm, voluptuous tone that encourages the development of interesting chord progressions and new riffs. I lack the skill to write music out, and my sight reading skills are quite poor. So I sit with a little Zoom recorder and when I come across something that I like the sound of, I hit record, play the bit a few times and then add some voice reminders of key, what chords, I am playing, the starting notes and any patterns involved. This helps me a lot with getting the approach down, because while I know what I like, I suck at writing out a rhthym so recording it makes sense for me, and might for you as well.
By keeping things simple in the sonic change, the work falls back to me and my fingers to get the job done properly. In my recent stress relief sessions that has worked out well, and I have been able to create some stuff that I find interesting and may end up going somewhere. After an hour or so, I realize that I have not been conscious of the passage of time, that my blood pressure and heart rate has relaxed. What stress was troubling me has subsided and I am in a better state.
It's written that music can calm the savage beast. Not so sure how beastly or savage I am, but the tone from this combination is absolutely a winning ticket.
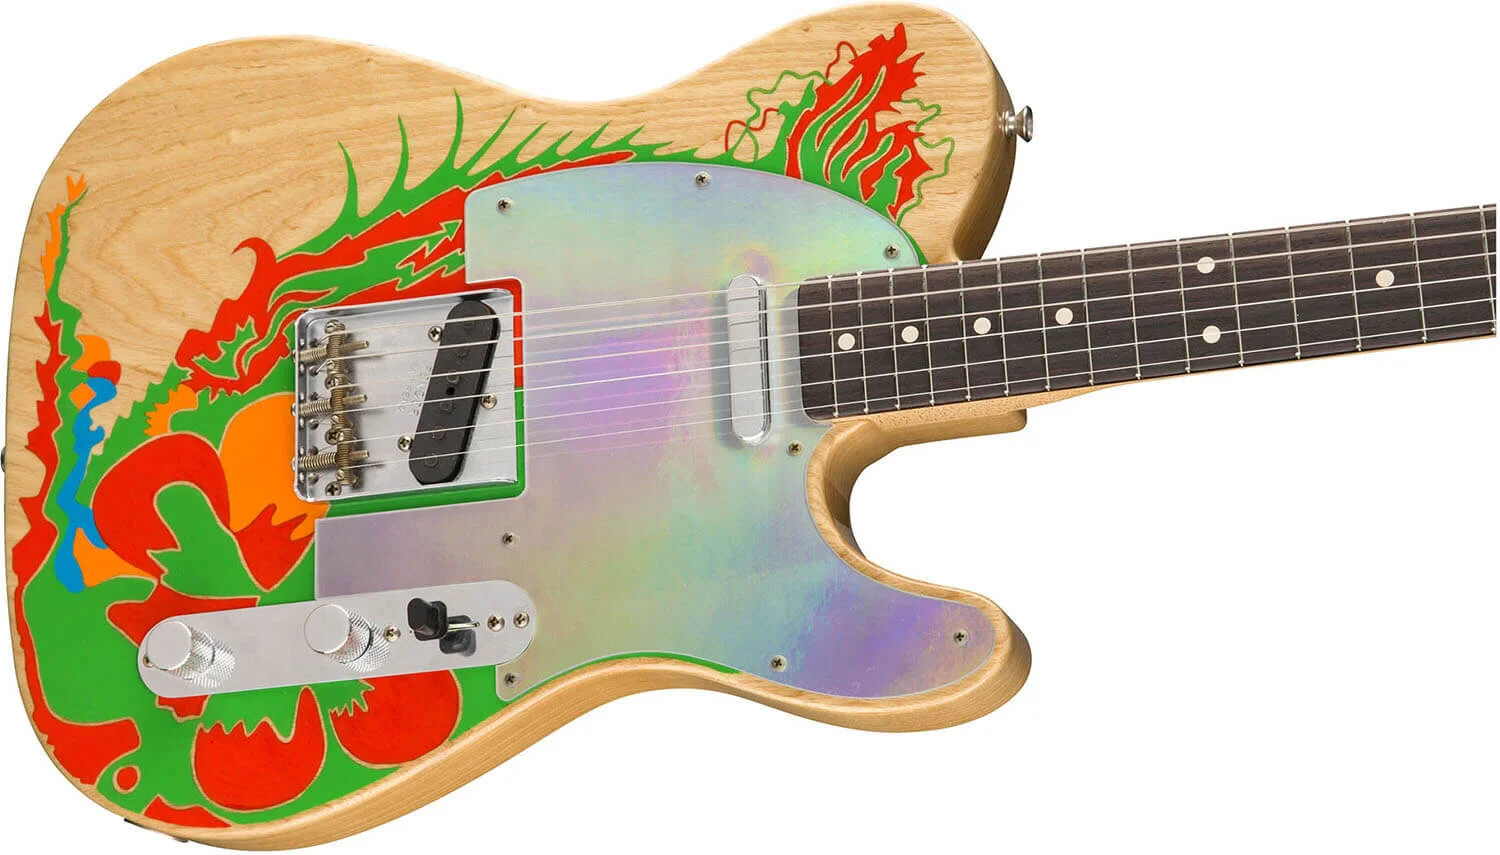
Review : Fender Jimmy Page Dragon Telecaster

Let me be clear right off the bat, I am not reviewing the 5 digit priced Custom Shop version, I am reviewing my own made in Mexico Fender Jimmy Page Dragon Telecaster.
When I was looking for the artwork for this article, I thought to go to the Fender website as they would have artwork for their guitars. Maybe the guitar is already no longer being built, because the only Jimmy Page Telecaster returned by a search is the Mirror version. Then again, Fender's website is not the most usable one out there. Fortunately I was able to grab all manner of Fender artwork from Long & McQuade's excellent web store.
At it's core this is a Fender Mexico product. What that means is that it is a very well put together instrument that plays well and sounds great, with a price premium for the Jimmy Page "signature" on the headstock and the Dragon artwork. It's not really his signature, that's only on the Custom Shop version, but as I own an original Jimmy Page Les Paul, I can verify that the signature looks like Pagey's.
This guitar comes with pickups specified as Jimmy Page 59 Custom Teles. I do not know what that means in real life, but it does sound good, and when you add in some pedal power, Communication Breakdown sounds like it is supposed to. But you and I know that you can make a regular Telecaster sound right if you have access to an old Tonebender, or a decent clone thereof and the right valve amp. Despite the moniker, you will not be nor play like Jimmy Page, but there is a bit of a rush that comes from playing the Dragon.
The artwork is well done with bright vibrant colours aligned with Page's original that he used poster paints on. The pick guard is not identical to the original of course, but will likely last longer and has the right look. You can string either through the body or through the top-loading bridge, your choice.

As is consistent with most Fender products right out of the factory, the stock strings are crap, so plan on an immediate replacement if you are not fond of pain or bleeding. This isn't just Fender of course, Gibson factory strings are perhaps even more horrible. Fortunately good strings are not expensive and my Dragon was refitted near immediately with Ernie Ball Paradigm Electrics, a string that I really like. I did not go with my normal set, staying with the gauge that came on the guitar which I believe to be 10-46s. That's what's on it now anyway.
It's got a classic Telecaster sound, with a bit more bite due to the hotter pickups. It's a bit more brittle than either my '67 Custom Shop or my 60th Anniversary which purports to be like a '51 but it sounds good nonetheless, just different. These are not top of line pots or guts but are not marked for immediate replacement. It's a good Mex Tele with a cool paint job. The rosewood fingerboard takes away some of the brittleness I would expect combining these pickups with an all maple board.
The neck is a custom oval C shape as preferred by Mr. Page and is finished with nitrocellulose lacquer. It feels good and has the expected 7.25 inch radius. The body is Ash and the topcoat is polyurethane. I would prefer nitro but it is what it is. The guitar includes a vintage style hardshell case.
Setup out of the box was decent, with no major tweaks required other than the near immediate string change. Unlike the more expensive nitro coated white blonde Mirror version, the Dragon didn't come with all manner of case candy so I went with a simple white strap and use a set of red Fender strap lock washer rings to hold it in place.
I like it. It's fun to play, sounds good, and has a really cool vibe. I find it similar but punchier to a 50's Tele that I have had for about 20 years out of Fender Japan (which is a real compliment). I would say that both the 60th and the '67 Custom Shop are better instruments with better body tone and overall playability. That said, it's a reasonably priced (sort-of) limited access piece. Mine is out of the case and in a rack so it gets played. Some might want one as a closet queen, but I expect that the Custom Shop versions will spend more time down that path. I own other Fender products out of the Ensenada Mexico factory and have found every one of them to be a well built instrument, a couple of them better than a Corona built Eric Clapton signature. Don't let the fact that this is a Mex built guitar get in the way of owning one if it appeals to you.

Review : YOMI from Frost Giant Electronics

Treble Boosters. You hear about these critters. You hear that if you like Brian May or Tony Iommi or Rory Gallagher or Ritchie Blackmore or Eric Clapton, you MUST have one.
Sure you can go online and search for an original Dallas Rangemaster for hundreds of dollars. Or you can get a new build of one from The British Pedal Company and my buddy Charles at electricmojoguitars.com. Or you could do what I did and take the advice of my friend Chris Spano at The Arts Music Store and hunt yourself down a YOMI from Frost Giant Electronics.
Chris told me about the YOMI when he asked that I do a review of The Mountain. I had been asking about fuzz and while there are folks who say that The Mountain, which is based on the ProCo RAT is not a fuzz, Dan Steinhardt over at That Pedal Show says that it is a fuzz. Be that as it may, Chris mentioned that Frost Giant did their own treble booster and that he grabbed the only one that came through the door and it never saw space on the retail counter. I checked and not only were there none in stock, the unit did not appear on the website. I went over to Frost Giant and their site said out of stock. Ru ro Shaggy. Over to Reverb and I found that the nice people at Axe and You Shall Receive (cool name huh?) in Brantford Ontario had two in stock.
Mine arrived quickly and while the version on the Frost Giant web site is black on light blue, I was fortunate to get one of the limited edition red on gold models as seen in the top image.
Documentation is like most Frost Giant Electronics products, meaning that it is non-existent. The YOMI has a knob marked Boost, an on/off stomp switch and a three way toggle that offers three different EQ options.
I was already set up for independent pedal tests with my silver Marshall 2550 into a silver 4x12. I had configured the clean channel to be super clean, even with hot pickups, and the ultra gain channel to sound like an overdriven Marshall, with Marshall style harmonic distortion but not fuzzy. I had the simple Marshall channel switcher on the floor and the YOMI on a stool in front of me to simplify tweaking. I ran direct from the guitar into the brand new Peterson StroboStomp tuner (review is coming on it), then to the YOMI and to the Marshall. The TC Electronics G Major that lives in the effects loop was completely bypassed. I checked the tone with an without the tuner and could hear no difference. All cables were Ernie Balls. About as generic as possible.
The first guitar that I used was my old Explorer. It's not a Korina body (sob) but it is solid mahogany and has nice heft. Like my Flying V, I find the factory pickups are a bit hotter than those in my Les Pauls and thought, hey why not. The Explorer sounds lovely clean, much as you would expect. Kicking in the YOMI in the clean channel and adjusting the boost brings a really nice bright distortion. Clicking through the three EQ settings you work with a three different levels of bass cut. I liked the top setting best which had the least cut. Definitely very playable and nice rich distortion. Wrong pickups for the Queen sound. Kick in the Marshall ultra gain channel without the YOMI and ah yes, there is Mr. Marshall. But add the YOMI and WOW! There's the sustain for days that was missing and while it sounds initially like you have lost some low end, I realized that I was getting a much more open top end than without the YOMI and pleasant feedback was readily available.
I love the sound. I will try a noise gate between the YOMI and the amp when I get around to it to isolate some of the other guitar noises when I am in glorius feedback territory, but I am not suggesting that this is necessary. You do want to play loud, which sounds wonderful but probably not your best choice at 2 in the morning. I was lighting things up between 4pm and 6pm so if I was annoying the neighbours, they had the good grace not to say anything.
I next moved on to my SG. It's a cherry model in the '63 style, albeit this '63 model as advertised from Gibson came from the time when Gibson couldn't remember that real '63s had the small headstock. So it has the large headstock. It's also got relatively low output humbuckers and while I have had it a long time, it's not a guitar that I go to very often. I had tried it with the Frost Giant SOMA (different review) and hated the sound. With the YOMI set to the top EQ and boost around 1 o'clock in the ultra gain channel it was quite nice. Not as quick to go to feedback as the Explorer but I expected that. Still going to change those pickups and I suspect that at the time, Gibson was using gum wrappers for caps and toilet roll for pots. There's no such thing as a vintage Gibson from the 70's or 80's that did not come out of the Custom Shop. But I digress...
Third guitar for the test was my red Suhr Strat, or as it is correctly known, the Suhr Standard Plus. This is a SSH configuration using Suhr's proven SSCII hum cancellation circuit. Mine is a rich red, a colour no longer listed. Which is good for me because it's freaking lovely. I love Suhr guitars, they are just so perfect right out of the box. I have this one and a custom shop Modern that my friend Andrew Lai down at Cosmo Music got built for me about ten years ago. Anyhow, the Suhr sounds great on its own, and although it is a humbucker in the bridge position, does not get all thickened up. I found it a bit too bright with the YOMI into the clean channel, but into the ultra gain channel on the Marshall with the Boost backed off and the EQ switch in the middle position it was really singing with any of the pickup configurations. I have found some pedals only work well with humbuckers while others only work well with single coils. Good to know that the YOMI handles single coils very well.
Obviously there is a lot more to do with the pedal. I want to put it into the pedal rig for my AC30 and try pushing P90s or P100s through it or one of the PRS guitars with the coils tapped. I've got a couple of very old CE bolt neck models that have the old five way rotary switch that sound awesome.
I had seen Mick and Dan on That Pedal Show covering treble boosters and while they did not cover the YOMI, I thought it was interesting that Mick concluded that if you run into a Marshall stack, a treble booster should be on your board. Brian May uses the Red Special into AC30s, and Tony Iommi played SGs into Laneys. BTW did you know that Mr. Laney was in a band before building amps? It was called the Band of Joy and included two other fellows who became rather famous, a Mr. Robert Plant and a Mr. John Bonham.
Thanks for reading and until next time, play on!
Review : Origin Effects Cali76 Compressor
Readers may start wondering if the only pedal that I really care about is the compressor considering how much web time I give them. Fair comment, but it is my opinion that the compressor is an under utilized tool that any guitarist or bassist can benefit from when used effectively.
The Cali76 from Origin Effects draws its name from the well respected UREI 1176 from Universal Audio that came out in the late nineteen sixties. The 1176 was a solid state design based on a Field Effect Transistor infrastructure (FET). The 1176 has been used on thousands of recordings because of its low noise, wonderful sound, fast attack and massive gain. My article on compressors in general explains terminology and common functions.
The Cali76 is a stomp box styled compressor. Instead of a VU meter, there is an LED in jewel fixture that changes colour depending on what is happening with the signal. Red is no compression, orange is compression being done, and yellow indicates compression of high input levels and the use of limiting. The original 1176 was marketed as a Limiter before it was talked about as a compressor.
The version that I bought, from Electricmojoguitars.com in Quebec is the Compact Deluxe or CD model. In addition to the meter lamp, there is a silent no click footswitch, mono in and outs, a power in port that will work from 9v to 18v and six control knobs.
It also comes with effective documentation, which you should read since the rotation direction of the knobs may be opposite to your assumption. There are both input and output level controls, so you can maximize the use with your guitar and if you wish also use the Cali76 as a clean boost. Clean boost does not mean that your amp may not be overdriven, it simply means that the boost has no coloration. This is something definitely not clear on the web or in some guitar stores. There is also a Dry control so you can mix your dry signal with the compressed signal. There is no “right answer” but Origin Effects’ documentation does provide some suggestions based on what you wish to achieve.
The ratio knob, controls, surprise, the compression ratio and I noticed that using higher levels of ratio does not immediately mean achieving audio mud. The circuit design in this regard is marvellous and it also doesn’t give that squished into a small can sound. Attack controls how quickly the compressor reacts to the incoming signal. Decay controls how quickly or slowly the compressor releases the signal.
With some judicious tweaking, you can get sustain that lasts for days, without things sounding all squishy or the compressor sounding like it is pumping audio. You can get bad sound if you try, as with any effect, but as with salt, a little goes a long way.
My first serious test involved a SRV Strat into a blackface Twin Reverb. Strats and Twins were made for each other, and I love the sound of a Strat in switch position four into a clean Twin with some reverb happening. Adding in the Cali76 did not usurp that tonal joy as does happen with many compressors, and I felt that harmonics were more open and the sustain was significantly enhanced.
Stevie Ray Vaughan was known for playing through a Tube Screamer into a Twin. I can barely spell SRV let alone achieve his sound, but I just don’t like the Tube Screamer sound with this combo, even when set to the secret and widely published SRV settings. Instead, I put a TC Electronic Spark Booster after the Cali76 and before a Diamond Memory Lane delay. I have been experimenting with Boosts, and in this configuration with gain up and the volume down on the Spark, when I kicked in the Cali76 the soaring sustaining lead tone is stupendous. It’s not distorted or fuzzy. It’s this beautiful warm subtly overdriven sound which is happening at the amp input stage. The only downside that I have found so far is that rolling off the volume control on the guitar does not clean up as it might with a Tube Screamer, but the quality of tone with the Cali76, with or without the Spark is worth it. This is also one of those scenarios so beloved of guitar pundits. In this setup, you can definitely hear a tonal difference between string weights. I keep the SRV strung with .12s, and even comparing to another Strat with Texas Specials pickups and .10s the tone from the heavier strings is much richer and warmer.
NOTE : The board configuration is changing as I just received my Origin Effects Revival Drive Compact. More to come on that.
I found this interesting as in general, I have to be honest, I cannot hear a tonal difference of different weight strings with the same pickups into the same amp. Adding the Cali76 and the Spark, there is a real difference, and I can still hear the difference with no boost at all when the compressor is invoked.
The Cali76 is not what I would call inexpensive. Regular readers will know that I like the Diamond Compressor and am very impressed with the Empress Effects Compressor. For those wishing to spend less, go for the Keeley Compressor Plus which is, in my opinion, the best value out there in its price range. However, if you are willing and able to spend over $400 CAD for a compressor, you want an Origin Effects Cali76. I bought it and kept it.
Will I buy any other compressors? Yes, I am waiting for the Cali76 Stacked Edition to come back into stock as I have a feeling that running an awesome compressor into another one of itself will be amazing. I’ve done this in the digital recording realm for a while using software based compressors with some really positive success, and now want to see what I can do with one live, perhaps on a really powerful acoustic tone.
Keep on playing
Review : A Bass for Everyone, the Sire Marcus Miller V7
Playing the bass is a great pleasure for me. There exists this illusion that bass is just a backbone instrument not given to proficient soloing or being a lead instrument. To those who may still buy into this fallacy, I offer you James Jamerson, Jaco Pastorius, Chris Squire, Geddy Lee and Marcus Miller. To see the fun that one can have playing bass, one only need to head over to All About the Bass on the Anderton's Music Youtube channel and watch the jams with Nathan and Lee.
Marcus Miller is an incredible musician. He was one of the top NY session players and also worked with Jazz genius Miles Davis. He's also an incredibly nice fellow if his interview with Lee Anderton is any indication.
Marcus Miller partnered with Sire to bring high quality basses to players who didn't have multi-thousands of dollars to drop on a great bass. I'm fortunate to have added a number of great basses to my own collection over several decades including Fender Precisions, Fender Jazzes and Rickenbackers. I also have an inexpensive Cort with a shorter scale that is a joy to play. I recently had the opportunity to get a Sire Marcus Miller V7 on evaluation to do this review.
Wow! Most times when you pick up a bass in the $500 range, you are getting something that might be a start to decency. Without wanting to throw Squire under the bus, that's a decent example. Having now been exposed to the Sire Marcus Miller series from V3 through V10, I cannot imagine why anyone would go with anything other than a V3 as their first bass, or if finances allowed, not just go to a V7 and play.
Although not part of this review, let me quickly touch on the V3 lineup. Here you find mahogany bodies with Canadian Rock Maple necks. The fretboards are rosewood with the rolled edges and fret smoothing that you typically need to go to high products for. The pickups are switchable for active or passive and include the comprehensive EQ system that Miller prescribes for all instruments bearing his name. Thus you have a three band EQ built in where you have control over what frequency the midrange control impacts. The bridge is solid steel and the strings load through the body. I've not found a bass in this price point that sounds or plays anywhere near this quality. And btw, the finishes are beautiful in a deep and rich gloss, not some horrible matte spray that says the maker was too cheap to do a nice and proper finish.
Coming back to the V7, we move to a choice of body and fingerboard options. There is a swamp ash body with maple neck and maple fingerboard, or an alder body with maple neck and ebony fingerboard. The latter is what I had for my evaluation.
The V7 has an offset body and at the risk of offending the Fender purists is very much like a Jazz bass in its body shape, nut width and overall profile. The controls are different than a Jazz bass because of the 3 band active EQ, and of course the headstock is different, but the V7 has the wonderful playability one comes to know from a Fender Jazz Bass built in California or in Mexico, or one of the rarer specials from Fender Japan.
Tone is lovely with a nice punch and enormous control when using the Active functionality and three band EQ. The volume knob is a double stack with the centre post being the volume and the outer ring being the main tone. The choice of Active or Passive is via a micro-switch so if you don't want to use the Active 3 band EQ, you do not have to. The pickups are enamel wound and have a nice brightness with excellent resolution. They are called Marcus Super J and are designed and built to sound like a vintage Jazz pickup. I don't have access to a vintage Jazz bass, but I like the sound very much.
When I ask newer players what frustrations they have, one of the comments is that their instrument is physically hard to play. This is most often due to a poor setup at the factory along with the use of lowest cost strings. When I ask parents of newer players what frustrates them, it's that their child doesn't play the instrument much after asking for one for months. When I ask if the bass was setup at time of purchase, most of them ask me what a setup is.
I deal with professional guitar shops. All of them offer a setup either at time of purchase or in the first year of ownership. A setup means that the instrument is going to be checked over by the resident instrument technician and he or she will adjust action, neck bow, intonation and otherwise check the instrument for maximum playability. Every bass player needs time to build up some calluses, but going through this on a poorly setup guitar is more painful than it needs to be. Online shopping is very prevalent, but if you as a buyer can spend time in a proper guitar shop, your odds improve.
The other reality is that no shop can afford to offer a free master grade setup on an instrument. This kind of thing can run into the hundreds of dollars and even a basic setup will normally cost about $75 or so depending on the instrument. It would be better if the instrument was well setup out of the box and already had decent strings on it, instead of the junk so often installed. I was very impressed with the V7. It was hung on the wall right out of the box after a very quick check and tuning. When I took it down, the only thing that I had to do was tune it. Every other setting was very acceptable to the majority of players as is. When I got it home, I checked the neck relief, the action and the intonation and there was nothing there that was bad. I found a minor fret buzz on the E string. It was slight and probably wouldn't bother to most people. I'm very picky and so a quick bridge saddle adjustment was required to slightly raise the E string. This eliminated the buzz but was not so extreme as to compromise the action.
I was very pleased to see that if at some point, I did need to adjust the neck there is a long slot for a neck wrench in the pickguard so you can make the needed adjustments without pulling the neck off. So sad that other instruments in this price range require you to pull the neck to adjust it.
I've been playing the V7 through a 60 watt Fender Bassman amplifier. This is an older solid state amp with a nice clean tone and no digital modeling. It has an active / passive selector and the only other non-standard thing is an Enhance button, that in my case, is always off.
Because this is a very basic and relatively low cost piece of kit, I do use a pedalboard with it. It's my only board that is all TC Electronic. Not by design, it just worked out that way. The signal chain is a Polytune 3 Mini, then a Spectrodrive, a Corona Chorus, a Flashback Mini and a Hall of Fame Reverb Mini. For my use cases, these are all excellent tools that do what they are designed to do without unwanted excess coloration. I have been pleased with the V7 whether I plug in directly or go through the board. The tuner is handy and I probably have the reverb on 90% of the time, albeit at a very low setting. The Spectrodrive is a great tool, particularly with basses that do not have their own EQ, and the compressor that is built in is exactly what a want for a bass. Plenty of added sustain with no squishiness. Regular readers will not be surprised because they will already know that I am a compressor dork. I only use the chorus or delay rarely in my use cases, but like many effects, they are essential when you need them, but otherwise idle. The V7 responds well to being put through this effect chain and I like the creamy sustain that I get from the Marcus Miller Super J pickups routed through the Spectrodrive. As an aside, if all you need is a bass compressor, just get the TC Electronic Spectracomp and be done with it.
The V7 that I have has a bound fingerboard. I realize that this sort of thing is typically marketed as an upgrade and it certainly is well done. However, if the fingerboard edges were not so nicely rolled and the fret ends so well finished, it would not matter. I find the edge and fret finishing on the V7 as good as a California built Fender Jazz Bass and better than most any other non-American built instrument. How do I draw this conclusion? Sit in the bass room and take lots of basses down and just run my fingers and hand down the neck. There should be no sharp edges or grabbing as you do so. This may sound like a small thing, but in the long term, it's a very big deal and takes a lot of skill and time to get right. I have tried instruments at three times the price where the fret ends were like a series of little dull knives. Not so the Sire V7. We won't even discuss instruments from other makers at this price point.
The conclusion? If you are looking for a bass guitar and want to keep your spend under $1000, or perhaps even less, there is, in my opinion, no better place to look that at Sire.
The Pick of the Picks
When we think about guitars, we typically don't think about how we engage with them. For some players, the interaction is all with the fingers, but for a large part of the population, that interaction happens with a pick. When we look at the pick selection in our music stores, there sure are a ton of pick options and materials. Tortoise shell, is thankfully, no more, but we have lots of choices in terms of plastics, nylons, and composite materials. Picks can be super thin, or super thick. Some makers actually gradate their picks with thickness measurements. Some are textured, some are smooth, some are tiny and some could be triangular dinner plates.
Plenty of choice. Like many of us, I have, over the decades tried all manner of picks in all kinds of materials. When I was younger, I searched for Herco picks because that's what my guitar heroes used, at least according to the interviews published in Creem or Circus magazines. BTW, you can get Herco picks today. They are one of several lines from the Jim Dunlop company. About ten years ago, I was standing in Gruhn's in Nashville, looking at all the guitars I could not buy, and noticed these really thick, clear picks. The salesperson told me that they were called V-Picks and I remembered having seen an ad somewhere for them. They were, at that time about $3 USD each and feeling flush with an American $20, I bought five of them in different sizes and edges. All of them were thick, over 2mm, and all were clear. They all had beveled edges, some with rounded ends and some with sharper ends. None were shaped like a traditional pick though. At the time I was using Jazz III picks pretty much exclusively. I liked them, but found them a bit small, and I had a bad tendency to let them slip away.
The V-Picks were unique. The longer I held one in my fingers, the more it tended to stay put. Not like glue, or sticky but just not sliding around.
Years have past and I have been using V-Picks since then. I first encountered owner Vinni Smith and his wife when they were based out in California, they are now in Nashville. Vinni is a class act who answers his own phone. If you have a question or an issue, he engages personally. I recently had a misshipment in an order, and Vinni made it right that very day.
The pick pictured at top is my current favourite. It's called the Screamer and the finish is what Vinni calls Pearly Gates. If that sounds Gibbons-esque, note that V-Picks do have several signature series picks, and there is a Billy Gibbons version.
[caption id="attachment_137" align="aligncenter" width="215"] Vinni and the Rev[/caption]
The Reverend Billy G is known for having played with a buffalo head nickel and his current signature pick features the special V-Pick edging process called Ghost Rim. This very subtle roughening of the edge of the pick produces a bit more string grab that can, in my opinion, really add to your tone.
[caption id="attachment_138" align="aligncenter" width="400"] Billy Gibbons Signature Pick[/caption]
Not everyone likes a heavier pick. Fair enough. I find them to be much more precise and help with my speed and accuracy. I've given, at my own expense, V-Picks to a number of local musicians and everyone has liked them. Now they want to know when I am doing an order to get in on things. In addition to the more traditional shape and the Screamer shape, V-Picks come in alternate shapes and colours to suit the player. They are also great for bassists who use a pick because of their lack of flex and high precision. I have successfully converted bassists as well as guitarists to V-Pick, not because I push them, but because the products are excellent.
I like the sharp pointed picks for electric (and they are really pointy - you could hurt yourself if you were stupid) and the more rounded ends for acoustic strumming and chord work. I also like the rounded ends for bass.
You can buy your V-Picks through some shops, but I prefer to deal directly via the website. With your order comes Vinni's business card (did I mention that he answers his own phone?) and a current printed catalogue. The catalogue is a nice thing, but there are always new picks being announced. The Farley was announced to me in an email only yesterday.
[caption id="attachment_139" align="aligncenter" width="400"] The Farley[/caption]
While I am not a big fan of the trad shape, I will be buying a few on my next order because even if they aren't for me, I have a lot of musician friends who prefer this style of pick.
One of the older ones, that I love was a glow in the dark version. I don't see them as available any longer, but will be asking about them as for me, being clumsy, easy to find in the dark. They don't slip from my fingers but I do place them down inadvertently.
I also recommend buyers trying the Ghost Rim and regular versions of a pick because the feel and the tone is different. Sometimes I prefer the sound of the ghost rim and sometimes I don't. The luxury is that we have the option as players to choose which way we want to go.
V-Picks also have pick holders, not dissimilar from the ones you see for regular thin picks, but sized to hold the thicker V-Picks.
It's possible that you may find 900+ words to be a lot on the subject of picks, but for many of us, our interface with the guitar is the fretting hand and the pick so maximizing that interface just makes great sense.

The 1965 Fender Twin Reverb Blackface Reissue

If there was one amp to appear on more records than any other, the Fender Twin Reverb would likely be at the top of the list. I don’t have access to the actual data so I for the moment this is speculation on my part.
The Twin Reverb is often associated with the American amp sound, but this is about as useful as saying that there is one amp maker that defines the British sound. Would that be Marshall British, Vox British or HiWatt British? Same deal for the so called American sound, although Fender’s market penetration, particularly early in the game was likely a runaway leader. This does not take away from other makers, such as Mesa Boogie or more recent players like PRS, but there is a difference in sound, and the sound of a Fender Twin is both distinctive and identifiable.
The Twin Reverb was built with the idea that the amp would not overdrive no matter how much you turned it up. Watts measurement is not really a consistent measure of how loud something gets. A fully cranked Fender Twin Reverb is rated at 85 watts. It will also destroy your hearing and shake walls. I think only the late Dick Dale found the Twin Reverb not loud enough, although Leo Fender did come up with the Dual Showman to accommodate Mr. Dale.
In addition to the seemingly endless clean sound, came Fender’s awesome spring reverb. If anything ever brings to mind the sound of deep twanging reverb it’s Fender spring reverb. There is of course a tremolo function in the amp, albeit called Vibrato incorrectly. This function has two controls for speed and for depth. This was a very popular effect in the Sixties, but some players, like to set the rate very low and the intensity very low and leave it on most all the time. I had not heard of this, but have tried it myself and really like the subtle widening effect it brings.
I had been told before I bought my Twin that it is so loud that you cannot turn it up past 1 in a home. There are two inputs on the reverb channel and I am plugging into the 2nd input most of the time and find that I can turn the amp up more, nearly to 3 in my room. Certainly not where the tubes are being thrashed, but a beautiful open clean tone. The dual 12” Jensen speakers sound marvellous and I like the open back design. Like many older style Fender amps, the Twin Reverb has those iconic tilt-back legs and I really enjoy that element.
I’ve kept my pedal board really clean for this amp. I have the supplied switch to control the reverb and tremolo, a TC Electronic PolyTune 3 mini, a TC Electronic Spark Booster, which provides a pleasant light crunch tone without compression or high end loss, and for the time being my old Diamond Memory Lane delay. The Memory Lane was really something when it came out, but delays have moved a long way and I expect to retire it shortly and replace it with something else with more delay options.
When I first received the amp, which I bought used from Guru Gear online (the company is located in New Brunswick Canada) I set all the tone controls at 5. I have had no cause to change these. My spankiest guitar is a Fender Custom Shop 1967 Telecaster and it is bright without being grating in any way. Even high output humbuckers sound good through this amp, but if you are looking for native overdrive tones, you are thinking about the wrong amp.
I own an “American” amp in the PRS Dallas. It is lovely sounding but is obviously darker and less spanky than the Twin Reverb. If I play with the EQ on the Boogie Mark V, I can get kind of close but there’s a fair bit of futzing around required to make the Boogie sound like a Fender. I briefly tried the new Boogie California amp before I bought the Twin Reverb, and it’s definitely got a different soundscape. Not bad in any way, but none of the spark of the Fender Twin Reverb.
I have heard it said that if you are a guitar nut and not bound tightly to a particular music style, that you need a Twin Reverb in your amp lineup. Even after over forty years as an alleged guitarist, I only just added one, and I am becoming a believer.
Review : Joyo PXL-Live - Yeah that's a NO
I have an awesome Cusack Pedal Board controller. The only downside is that it’s pricey so when I wanted another one, I went out on the web to do some research and after poking around for some time, decided to try the Joyo PXL-Live.
Web reviews were all over the place on the Joyo, but it was relatively inexpensive and was coming from Amazon Canada so I would be able to return it if things didn’t work out. In concept anyway. Unfortunately the packaging and alleged documentation got put into recycling by accident even before I had time to set the thing up.
Joyo is vaguely clear that this device is a bank switcher, although Amazon describes it as a pedal switcher or loop switcher. If those latter items were true, you would be able to define programmed banks of effects, and / or use it as a proper loop switcher to manually switch pedals in and out of the chain, just like on the Cusack unit. Even Joyo’s website calls it a pedal switcher. Nope.
Wrong again honey. It’s a bank switcher only. And not a particularly intuitive unit either. The docs are not as bad as some reviewers suggested but if you need a 20 minute video to get this thing set up, there is a problem in there somewhere.
When I finally got it all connected up, it worked as a bank switcher. It does not work as a loop switcher. Joyo support would need to improve dramatically to achieve the level of completely sucking. If you buy one, you’re on your own mate and good luck with that.
The unit is well built and the switches are both reliable and quiet. I did not encounter any of the popping noises that other people mentioned. There is a tuner out that does not use up a loop, but access is goofy requiring multiple button presses. Intuitive it is not. There are MIDI ports that I did not use and trigger ports to allow you to ostensibly use the device to switch amp channels. Did not try those either because I have no need for such a thing. I have the foot switch that came with my VOX to switch reverb and tremolo in and out, and it works, so why complicate matters?
Switching banks is always a two press at minimum process. You select your bank and then you select the preset in the bank. Don’t think about fast switching in the middle of a song, because that’s not going to happen. Nor is there any way to kick a single pedal in and out once a bank is active, which means if you want to kick in a boost for a solo, you need to do the tap-dance to switch to a different bank preset. Marking that down as mostly useless.
The one upside to the device is that it can be two separate sets of four loops or a single set of eight loops. This configuration is as simple as determining if you are using the four cable method. If you are, you get two sets of loops so you can run one set in front of the amp and another set in the send/return section of your amp. That one part I thought was awesome but it was outweighed by the challenges in using the device otherwise.
Because the packaging got tossed, there was no return option. It lasted on my Vox board for about eight days and once the frustration hit the high water mark, I pulled it off and rewired everything. Everything works but the pedals are not on isolated loops any more.
If I could find a proper pedal switcher that supported two separate chains, one into the front of the amp and one into the send/return that would be ideal, but this critter only gets me part of the way, so I will look to trade it in towards something else as another musician might find it ideal for his or her use cases.
On the note of finding an alternative, I have. Joe from TheGigRig advised me how to use one of their awesome QMX pedal switchers to have some of the loops go in the front end of an amp and the remainder in the effects loop. QMX-10, here I come!
Joyo PXL Live? NOT recommended
Review : Blackstar HT-5RH
A key part of my guitar affliction is the related amplifier affliction. While my family might propose that I have too many, I can always see place for at least one more. I also tend to prefer the sound of valve (tube) driven amps and while I have bought and sold many, they always have one characteristic. They’re really loud.
So I wanted an amp that I could use for practice at night, at home, that would still deliver a good tone, would handle pedals well, had an FX loop, great reverb and didn’t need to be glass rattlingly loud to get there. I went by my local shop, The Arts Music Store, and the very talented and genuinely nice Chris Spano invested the time to help me find something. I had heard about the Blackstar HT-5R Mk II on the Anderton’s Music channel as well as some other decent low wattage amps. Chris took me through a number of offerings, but I did not enjoy any of the solid state units. I was ok with all valve, or valve preamp with solid state power amp based on the contestants. In the end, It was down to the Fender Pro Junior IV or the Blackstar HT5R. I liked the little Fender but found the Blackstar to be more flexible in terms of options and controls.
Chris helped me decide between the combo version or the separate head and cabinet. I chose the separate head (HT5RH Mk II) and cabinet route. The cabinet is the HT-1120C Mk II which houses a 12 inch Celestion Seventy 80.
What I love about the HT5RH is the flexibility. This allows for two output levels, either full power or 10% power. It’s the same circuit design as in the HT20R family and in my opinion perfect for home use because it is immediately switchable between 5 watts or 0.5 watts and while we know that we hear differently at different volumes, dropping the output does not result in the massive tone suck found so often in circuits of this type.
Here’s the key features list;
5 watts / 0.5 watts
Unique push/pull power amp design
ECC83 preamp valve, 12BH7 power amp valve
2 channels
Footswitchable voices for clean and overdrive
USB Audio out
Studio quality digital reverb
4-16 ohm speaker jack
XLR DI output
Stereo line / headphone output
There are two channels, Clean and Overdrive and each channel has two selectable voicings. The first is the “American” voicing which I find very Fender like and the second is a “British” voicing which sounds to me more Vox / Hiwatt like than say Marshall. Again, it’s an opinion and yours may differ. Both my Marshalls are big 100w heads and they are, in my mind, unique sounding. The amp came with a foot switch for channel and voice switching. In practice scenarios, I tend to find myself using the American voicing more often, possibly because I am looking for that Fender sound for clean and jazz tones. When in Overdrive mode, I use the different voicings depending on the pickups in the guitar that I am playing. I will say that the little Blackstar is very good with all the different pickups that I have run through it, but is particularly nice with the Eric Johnson pickups in two of my Strats and really likes the Seymour Duncan Antiquity pickups in my early 70s Les Paul. It even handles the pickups in the White Falcon very nicely, and in my experience getting a great tone from those can be a bit of work.
It incorporates a redesigned Reverb. I have no experience with the old reverb so all I can say is that this one sounds pretty nice. I have a Keeley Caverns in the effects loop and use that more often than the built in reverb because the Caverns has an elegant and well controlled Shimmer facility that I really enjoy, particularly at low volumes.
The Clean channel has a simple layout, basically a volume knob, a tone knob and the voice button. The OD channel adds a gain knob as well as separate bass, middle and treble controls in addition to the ISF function mentioned below. The front panel also includes a master Reverb control, a channel switch button and the output power select button
The voicing is more finely controlled by the ISF function that Blackstar refers to as the Infinite Shape Feature. It’s a variable pot that goes from the American to the British voicing and whatever you like in between. This is particularly useful if you use the USB out to your DAW and want to include those voicings.
The rear panel has the USB out, a level selectable (+4/-10db) effects loop, an MP3 player line in, a pair of emulated outputs, more on these next, three speaker outputs fusing and the mains connector.
The amp also features an XLR out to DI, and the ISF function works there on the OD channel. In addition there is a stereo ¼” jack for output. There is also a push button to select between either 1x12 or 4x12 speaker emulation for the outputs. The stereo line out can also be used as a headphone output. This massive flexibility was a key differentiator for my use cases.
Since this is my defacto practice amp, I wanted an FX loop as a place where I could trial pedals and I am a bit overzealous in determining what goes where. The WL-50 Receivergoes into a Dunlop volume pedal which then goes to a Diamond Comp Jr. The tuner out on the volume pedal goes to a Polytune 3 Mini. From the Diamond, the signal moves to an Xotic RC Booster V2 and then to a Wampler Tumnus Deluxe and then to the amp’s input. These are all excellent pedals and I find no line or tone loss up front. The FX loop pops out to a Keeley 30MS doubler, then a Diamond Halo Chorus, and then to a Keeley Caverns before returning to the amp. All the pedals are on a Pedaltrain Metro 20 board sitting on top of the amp head. The board is not overly clean so it’s easy to wire up a new pedal anywhere I want it in the chain to try things out. Before a pedal gets to another board it has to pass the test on the Blackstar board first, that’s how much I like and trust this amplifier.
It’s not kidding that this head and cabinet practice rig cost a lot more than a similarly powered modelling solid state amp would have. It’s my money and my use cases and a number of other things that I tried simply did not sound acceptable to me where the Blackstar HT5RH Mk II has never let me done.
Highly recommended
Restringing a Rickenbacker 12 string / How to become an alcoholic
I was at my local guitar store, The Arts Music Store in Newmarket Ontario chatting with my dear friend, store manager, Archy Hachey this past Saturday. We’re of a similar generation and he asked what excitement I had planned for my evening. I told him I was going to be restringing a 12 string because the strings that I had ordered special for it had arrived in the mail. Archy, being the knowledgeable gent that he is noted that doing so is what he calls a four fingers job, making the gesture for four fingers of fine single malt Scotch.
The guitar in question is my Rickenbacker 381/12v69 12 string. Ric 12 strings are strung with the pairs reversed compared to other twelve strings which helps give them their rather distinctive sound. The 381V69 is nominally thicker and heavier than the more widely known 360/12 and has a double bound body and lacks the rounded edges. The maple top and back are highly figured, mine showing a lovely birdseye figure. The necks are a traditional Rickenbacker dual truss rod style and the headstock is the classic Rickenbacker 12 setup with 6 tuners out the sides and 6 tuners out the back. That means six use traditional posts and the other six use the roller type one finds in a slotted headstock. Ric slotted headstocks are only open on the front however, and I will come back to that.
You can see the headstock clearly in this image from the Toronto shop The 12th Fret at www.12fret.com
I’ve owned the guitar for probably twenty years and never played it much. It needs a bright and clear amplifier and the narrow fretboard combined with my sausage fingers never seemed to go anywhere. In fairness, I also didn’t make a big effort at the time because I was in one of collecting binges. So it hung there on the wall. The strings were fresh when I bought it, and were age dead rather than corrosion dead. I decided I was willing to put the time in on it and discovered that Rickenbacker recommended a wound third string instead of plain. A quick perusal of my string inventory as well as some online work and I found that I would need to order some.
I discovered a shop on the net called Pick of the Ricks. They do all things Rickenbacker so I ordered two sets of Rickenbacker branded strings and one set of custom made Curt Mangan strings made for the 12 string electric Rickenbacker. They arrived in a reasonable time and at a fair price. I only later learned that I could get the Rickenbacker branded strings locally in Canada from Long & McQuade Musical Instruments. Such is life. I probably could have saved a couple of bucks, but I now know of a really cool Ric related shop.
Prep
I will start off by telling you that you will need some tools that you would expect and some that you would not. If you don’t know where to go for such tools, your better guitar shop may sell some or you can go online to Stewart-MacDonald, which is what I did a long time ago and all those tools still work today.
Guitar polish
Nut and saddle lube
#0 Phillips screwdriver
3/32 flat blade screwdriver
Fingerboard guards
0000 Steel wool
String Winder
Side Cutters
Electrical contact cleaner
Straight edge or relief gauge
Truss rod wrench
10mm wrench
Super fine flat file
Fine polishing tape
Long nose hemostats
Dental mirror
Gaffer tape
Ok, let’s get started. Unwind the old strings. When they are loose enough, they will be easily dislodged from the R tailpiece. Often they will just fall out. Make note of this, it will bite you later. Use your side cutters to cut the strings near the nut so you don’t take your eye out trying to remove them, especially the ones on the tuners in the headstock slots. Needle nose pliers will be a help, but I strongly recommend a set of long nose locking hemostats for this purpose. You can find such things on Amazon. Orient the holes in the tuners as you normally would for the top facing posts, and follow the guidance in the video linked below for Bill Baker’s Three Finger Method for the tuners in the headstock slots.
Use your Phillips screwdriver to remove the bridge cover and the truss rod cover and don’t lose the screws.
Now’s a good time to clean everything. Use your small flat bladed screwdriver to loosen the grub screws holding the knobs on the pots, remove the knobs and stow them in proper order. I use a small amount of electrical contact cleaner sprayed into each of the pots and into the pickup switch. I then work the pots and the switch a fair bit. It’s pretty amazing how much smoother that they will get. I put some cloths around the pots and the switch to avoid getting the contact cleaner anywhere else.
Next take your relief gauge or straight edge and check the neck. Unlike other guitars you cannot remove the truss rod cover when the strings are on because they ride on it. Even if you could, you wouldn’t get a truss rod wrench onto either of the truss rod nuts with the strings on anyway. Perform your truss rod adjustments as necessary. If this sounds like a black art to you, there are good tutorials over at stewmac.com Seriously, this is a skill all guitarists need to be comfortable with.
Ok. Now screw that truss rod cover back on. Take some guitar polish and spray it on to a clean microfibre cloth. I use Jim Dunlop Formula 65 because I find it cleans up quick, has no abrasion and doesn’t build up. Clean the body and the fretboard. This is a lacquered fretboard so not a place for fretboard oils and such. Just use the polish and scrub that board with that non-abrasive cloth. Now fit your fingerboard guards to isolate each fret and polish them with the 0000 steel wool. If you do not have fingerboard guards, gaffer tape works. You can of course buy fret board polishers and even wheels for your Dremel but if your guitar is in even vaguely good shape, steel wool does a good job. Once all the frets are done, come back with more polish and a clean section of cloth and clean up the detritus. You may be surprised how much there is. At this point, I go a step further every few years. I put a bit of Autosol on a soft felt wheel and with fingerboard guards in place, gently run the wheel in a small Dremel over the frets. This not only polishes them a bit more, but it also works to protect the frets a bit. Be gentle and use the Autosol sparingly. If your top facing tuners have hold down nuts, tighten them up with your wrench. You do not need to tighten them excessively, just so they are not loose. My guitar in this case has no such nuts so I do not have to do this.
Take an old dry toothbrush to the nut and to the bridge. The bridge is not anchored in place so be sure it does not slide all over the guitar top. With a magnifier inspect the nut for excessive wear. If the guitar was playing well already, the cleaning of the slots is all you will likely need to do. My experience is that the saddles on Ric bridges are very rough. I like to take a very fine file and just clean up any burrs or such near the string notches. It’s a small thing but makes a difference.
This is also a good time to take that fine abrasive tape and do a couple of passes on the tuning rods in the slots on the headstock. I have encountered one that had a burr on the edge of the hole that was hard on the string. Takes about 5 seconds per post.
Wipe down everything that you filed. Now prep it for strings by applying a lube of our choice. Whether you use a commercial product such as Nut Sauce or powdered graphite is up to you, but be sure to apply some lube to the now clean nut slots and to the string notches in the bridge.
Reinstall the potentiometer knobs and tighten them so they are sitting a bit proud of the deck so they do not bind. Place your guitar on a stable flat surface with a neck rest. I built my own, but you can also buy commercial ones. I have an old heavy ironing board that I cover with a piece of carpet underlayment for my work surface. It helps prevent the guitar and neck rest from sliding around, and the height of the ironing board means that I am not bent into a position that is going to give me neck or back strain.
And Now Alcoholism
I am convinced that the original engineers were drunk when they designed the stringing method for R tailpiece 12 strings. Or that they had a massive amount of malicious intent. My guitar has the R tailpiece. It looks fab. Architecturally it is an instrument of torture which is why the answer to how to restring an R tailpiece question has the typical answer of replace it with a trapeze model. I want to keep the R. The problem is that the R is only accessible from the bottom and the string slots and ball notches are irregular on their best days. By irregular, I mean that the slots are of varying widths not aligned to string demands and that the ball notches are more like “it might notch, but probably won’t, and the string will fall out at any time until fully tensioned”. I tried following the methods on YouTube videos. Frankly this resulted in profuse sweating, the use of creative metaphors at some volume in a variety of human and Klingon dialects (it’s important to know how to swear in multiple cultures), and a broken high A string after having to redo it several times. So my Ric has a high A from an Elixir 12 string set.
I have come up with a process to restring Ric 12 strings and will now be happy to do it for a fee for any local owners who have decided that heroin abuse is not a path that they wish to take. Here’s the deal. Note that the amount of Writer's Tears Irish Whiskey required to develop this method is not shared.
I presume that you have all the old strings off. If you skipped the section called Prep, go back and read it, because there are tools that you are going to need noted there.
An R tailpiece is actually two pieces. There is the part that is anchored to the guitar and the R itself which comes off when there is no tension on it. Most of us restring one at a time. Doing so is an exercise in frustration with an R tailpiece. Take it off and place it on a stable surface with lots of space upside down. Open each pair of strings, and place them in the proper slot and the ball in the proper notch. Rotate the string so the barrel of the ball end is parallel to the face of the notch. If you do not do this, strings are highly likely to pop out. Put some tension on the string to try to seat the ball in the notch. Do not be surprised when this only works marginally.
Take your time and load all the strings in the tailpiece and let them rest on your work surface. Remember I mentioned that you will need space, because you do not want to bend or kink the strings. Use a magnifier and a light to confirm that all the balls are properly in their notches. Then check twice more, because if the strings pop out when the tailpiece is mounted, you will wish that you had six inch long ⅛ inch wide sticky tipped alien fingers and the ability to rest an eyeball on the top of the guitar so you can see upside down. A dental mirror is a reasonable substitute. If you don’t have a mirror, you probably did not read the prep section. Avoid having to use this by employing the musician and photographer’s best friend, a roll of gaffer tape. Gaffer tape is NOT duct tape. Buy some from your music or camera store or get it on Amazon. Gaffer tape sticks well but also comes off well and leaves no residue behind.
Once your strings are in the tailpiece, take a piece of gaffer tape and wrap it starting on the bottom around the back of the R opening and then across the top of the R in a U shape to hold the strings in the slots and the balls in the notches. Take the time to ensure that it holds things in place, or trust me, you will regret not doing so later.
Now flip the tailpiece over and mount it on the guitar. It will not lock in place until there is string tension, so use some more gaffer tape to hold it to the mount.
Now step away and take a short break.
Come back and check twice to ensure that the right strings are in the right slots and that everything looks right. Remember that Ric 12s have the pairs oriented in reverse to all other 12 strings. Now head over to Bill Baker’s video on his three finger method for handling the strings that go on the tuners inside the slots. I found this too late and it will make your life easier and avoid the strings going slack when you are winding them on and thus reduce the likelihood of a string break.
My method involves winding on all the strings that go into the slotted headstock tuners first. I found that doing them in order was a pain. Bill also recommends working from the outside in and I support this method, so go E A D, then E B G. Wind them on so they are snug, but not up to tune. Then go on to the strings that wind onto the upward facing posts. Give yourself enough slack on these guys to get at least three winds on the post. I tend to put an L in the string about 1.25” past the post and use that as a guide. Bill likes to lock his strings, I don’t do this, you should do whatever you are comfortable with but be sure to get those three winds on the post or you may not like the sound.
Once you are assured that the strings are sitting in the proper saddle position in the bridge and are tense enough not to move, replace the bridge cover.
Now tune up, and you will probably find it easiest to alternate sides, doing the low Es first then the high Es, then the As etc. Now go through whatever your normal stretching interval is and retune. Play fairly aggressively and retune. I found that with the Rickenbacker branded strings, my normal stretching method required four retunes before the strings held. This is more than I am used to but again, not a big deal.
You are now ready to play. Find some Byrds or Tom Petty or whatever and have at it. Don’t forget that bright clean channel and buckets of reverb!
REVIEW : Keeley Caverns
Ok this is just my opinion, but I think that there are two classes of pedal effects. The common and relatively inexpensive that do a decent job and are the mainstay of many pedal boards, and then the more esoteric or refined choices that are used in a lower volume, cost a bit more and provide a different soundscape. I am an admitted pedal geek, having more than I really need. I’m not Dan Steinhardt of That Pedal Show in terms of owned quantity or knowledge but I have been playing guitar for a long time (adequately at best) and know what I like.
Robert Keeley is the man behind Keeley Effects. As of this writing, I only own three Keeley products, the D&M Drive, the excellent 30MS Double Tracker and today’s write up, the Caverns.
My friend and long time guitar specialist tweaker Darryl Bradley of The Arts Music Store in Newmarket Ontario turned me on to the Caverns. I had mentioned in passing that I was moving my TC Electronic Flashback Mini and TC Electronic Hall of Fame Mini Reverb to my bass rig and would want to replace them in my practice rig based around the Blackstar HT-5R Mk II amplifier. Darryl advised me that I needed to try out the Caverns from Keeley, and arranged for a test period.
Let me say that the testing period was over really quick because this pedal just fit right in. It combines delay and reverb in a what looks to me to be a two sided pedal, not unlike the D&M Drive.
The Delay side offers three voicings, Off, Deep and Light along with controls for Time, Rate, Repeats and Blend. Very intuitive and quick to master. It is based on the proven Keeley Magnetic Echo model which has a very analog tape feel to it. The voicings allow introduction of wow and flutter effects common to analog tape delays of yore.
The Reverb side offers Spring, Modulated and an amazing Shimmer mode. I would say that the Shimmer is the best that I have heard outside of Eventide’s SPACE or H9 MAX pedals. They are of course, excellent but quite a bit more money, being built to do more. The controls are Blend, Decay and Warmth with a Rate control that applies when the Shimmer voicing is used.
The switches are positive and not overly clickey or super resistant. I’m running my unit off a pedal board power supply. The inputs and outputs are TRS type so if you have only a single chain or amp it works great but if you want to use two effect chains or two amps, you just need a TRS male to dual TS female adapter cable
There are also internal DIP switches to enable True Bypass or Trails if you wish. The device manual is really a cheat sheet as is common for stomp boxes.
Even though it is a single page, the necessary info is there to get you going if you happen to be one of the kinds of folks who actually reads the documentation on a product.
My use case is for practicing at low room volumes. That’s why the Blackstar HT-5R Mk II in the first place. While the amp has decent reverb, I prefer the reverb options in the Caverns and it’s pretty much always on. What I particularly appreciate is that when the delay is kicked in, it doesn’t fight with the reverb and there is none of that wallowing soup pot tone found when you mix delay and reverb in other scenarios.
I have bought and tried a lot of delays over the years and own some really marvellous ones, but will propose that you will likely find it hard to beat the functionality and tone in a Caverns with anything else near this price point. Definitely recommended.
First Impressions : The TC Dreamscape
Suppose for a moment that you prefer stompboxes to rack effects, but your board is getting a bit large and you would be ok combining Chorus, Flanger and Vibrato into a single pedal because you would not be using those effects together. Suppose also that you would like the idea of being able to store a couple of defined sets of settings per effect and also be able to create your own setups, or use the setups of other artists.
If any of this makes sense, you may find The Dreamscape by TC Electronic to your liking. The Dreamscape is a signature pedal approved or designated or whatever by John Petrucci of Dream Theater. Whether one is a fan or not may be of less import. Credit to Mr. Petrucci for understanding the power of his brand and leveraging it wherever he can, including with excellent products from Ernie Ball Music Man and Mesa Engineering.
Clean layout that is easy to read
I bought The Dreamscape, not because it was endorsed by Mr. Petrucci but because the idea of a simple stompbox that had the functionality described in the first paragraph made sense for me, and because I needed to replace the Corona Chorus in my AC30 board because I had moved it to my bass board. I could have bought another Corona, which I like very much, but I thought that I would try something different.
I have not been a big flanger user since the 80s when they were the next hot thing, but as I tend to play more older stuff than newer, the benefits were there. I also like a gentle chorus without high speed or massive sweeps from time to time, and find that it works well for ambient work alongside an excellent reverb. The reverbs in my Vox AC30 Top Boost and Koch Multitone (no longer made) are particularly nice and complement a rich yet subtle chorus very well. I use finger powered vibrato a lot but have not (yet) been a big consumer of it as a consistent effect. It's in my old Eventide Mod Factor, but I never really glommed onto it as a pedal effect. The Dreamscape gives me two presets for each of the three effects and the factory defaults are decently usable. I appreciate this as a I often find factory presets significantly overdone and annoying. I have an old G Major 2 in the effects loop on a Marshall 2550 and find most of the factory defaults completely unusable. The Dreamscape proves the exception.
Like many TC pedals, The Dreamscape has the Toneprint function. This allows you to download existing Toneprint files, or to create your own based on your own experimentation in the Toneprint Editor which is available for macOS and for Windows. There is a companion smartphone app that allows you to store multiple Toneprint files and "beam" the one you want to use to the appropriate pedal by bringing the phone speaker up to the pickup in your guitar and sending the file to the device without needing cables or the like. For a live performer, this flexibility is wonderful. If you are playing for your own enjoyment only, it still is a real benefit because it encourages creativity because you can Toneprint settings that you really like and not lose them when you start to twiddle effects. Learning to use Toneprint is not hard, and it really adds to the potential return on value of the so equipped TC Electronic products. A side benefit for me is that all my Corona Chorus toneprints can be used on The Dreamscape.
There is also a bright/normal/dark switch that changes the voicing of the effects accordingly. I use my Dreamscape mostly in the Normal position because those sounds please me most, but again, having some variety is a good thing.
The knobs turn smoothly but are not overly loose. There is no binding. The footswitch is click free and is smooth to engage. The pedal is the same height as my other pedals on the AC30 board so I don't hit or miss the switch as I move back and forth. I use it with a pedal board power supply unit but it will run on a 9v battery if you wish. The pedal defaults to True Bypass but is switchable to buffered if you prefer. There is also a Kill Dry option if you use it in a Parallel Effects loop. The only amp that I have that has this is the Koch and I have not tried the pedal in that loop as yet.
I do run The Dreamscape in the effects send/return loop on the AC30. I just prefer time and modulation effects there. You should do what you prefer.
TC says that the pedal is analog-dry through so your unaffected signal is truly unaffected. Turning the effect mix to zero results in no colouration as expected.
The Dreamscape supports mono and stereo in as well as mono and stereo out. The only real downside is that the owner's manual is just a one page startup guide. TC make great products but I have never found their documentation to be all that good, even for complex things like the G System or G Major. On this subject, they could stand to take a lesson from Eventide.
Note the clear power requirements and the mini USB2 port
You can update the firmware and connect the pedal to your computer for use with the Toneprint Editor via USB2 and a cable comes in the box with the unit.
Whether you get The Dreamscape because you aspire to Petrucci status or just want some of his signature tones or because you like the idea of having three useful effects in a single easy to use pedal is entirely up to you. I own a number of TC pedals and have only returned one because I did not like the sound (HyperGravity Compressor). Calling this one Recommended.
REVIEW : Empress Compressor Mk I
Always on. That's how I tend to think of a great compressor. Personally I won't use a compressor that doesn't allow me to leave it on all the time. That doesn't mean I've got the thing fully cranked. I'm looking for some gentle compression, some additional sustain without boost, and no tone colouring.
Empress Effects is a Canadian company, founded by a graduate in Electrical Engineering from Queen's University, named Steve Bragg. Since founding, Empress has grown but is still small company staffed by people who live and breathe great effects pedals.
For years I have recommended the Diamond Compressor (and still do!) but I wanted something more like a studio compressor that I used in another life. I wanted control of compression level, attack, release, plus the ability to control the mix of the compressed and uncompressed signal. Different guitars are different. Pickups respond differently and we know that different pots have impact on the sound. Then we plug into different amps, be they valve or solid state and they all have their own sounds. Push some valve heads really hard and they naturally compress. Think of a Marshall 100w head when cranked, but do it quickly before you go deaf. Turn a really great solid state amp up and it just gets loader. An example here would be the still brilliant Roland JC-120 Jazz Chorus which does a nice job of holding clean tone while it attains disturbing the peace levels of volume. Combining different guitars with different amps and you have a lot of variables. This is why most studio recordings use compressors all the time.
The Empress Effects compressor is the finest stomp style compressor that I have ever encountered. And because I am a geek, I have tried a lot of compressors. The very famous Ross design compressors are popular with lots of people, but I don't like them. I don't want a compressor that sounds like a limiter or a dynamic range squishy toy.
The Empress fits my use cases. I can select from 2:1, 4:1 and 10:1 compression ratios. Some folks may prefer a constantly variable level, but practical experience tells me that I prefer consistency. I tend to run 4:1 most of the time, but it will be dependent on the combination of the guitar and amp. I also like the meter which basically can show you the input, the output or the combination. It shows you what the compressor is doing in real time and is a really great way to see live if you are over squishing, which may sound ok in one place and sound like cat yack elsewhere.
In addition to the controls for input and output, you get very effective controls to set the compression attack and compression release. There is also the Mix control to allow you to determine the blend of dry and compressed signal.
Set up is a breeze and you don't need an engineering degree to get going. The only piece that may be a bit confusing is the Sidechain jack. This is a TRS connection that allows you to bring in another device (it's a loop) such as a high pass filter that you might want to use if you are concerned about very low but high energy bass notes tripping the compressor. With the growth of 5 string basses, this can be a very useful tool.
Generally a compressor goes very early in your signal chain, and definitely in front of the amp. In my case, it goes first after the wireless receiver, and then to overdrives etc before they go into the front of the amp. However, it's your tone, try the compressor in different places until you find the sound that appeals to you most.
Why I have chosen the Empress Compressor is because it NEVER colours my tone. I can push it hard and I have to really do so before I get clicks or other compression artefacts. It is so much a better experience than TC's respected HyperGravity which I returned because it clicked so much even before I got to the level of compression that I wanted.
I have made note of settings for different guitars and different amps, because low output single coils into a sparkling clean amp will benefit from different settings than the PAF want to bes in my R9 into a Silver Jubilee. What makes the Empress awesome is how versatile it is. If I did star ratings, this would be a 5 out of 5. If your dealer doesn't carry Empress, ask them why not. Admittedly they are not the cheapest thing out there, in fact they may be seen has a premium brand. Fair enough, premium sound for that price.
REVIEW : Seymour Duncan Antiquity Pickups
I’ve still got my first Les Paul. I worked the entire summer when I was fourteen to buy this guitar. An Etobicoke store said that they had Cherry Sunburst Les Paul Standard in good condition used, so with my earnings in an envelope, I convinced my dad to drive me up there so I could check out the guitar. Being fourteen at the time, I was blinded by the cherry sunburst and that it looked kinda sorta like Jimmy Page’s Les Paul so I plopped down my money and bought it.
Over the years that I owned it, many discoveries were made. First, it was not a Standard at all, indeed Gibson was not making Standards in 1971 which the serial number told me that the guitar is. It started life as a Deluxe but the previous owner had pulled the mini humbuckers and replaced them with something else. My dear friend Darryl, who is also an accomplished guitar tech replaced the whatever with a pair of Duncans (a JB and a hot something) about fifteen years ago, and for a long time I was quite happy with the sound.
Which brings us to 2019. I have the pleasure of having collected guitars for a long time, and don’t play that Les Paul very much. I plugged it in and determined in short order that I did not like the sound. My tastes have changed over the years and I wanted something that sounded more like my R8 or actual PAFs.
You see this Les Paul is of the Norlin era. Despite what the web and some dealers will tell you, the 70s were not a great time for either Gibson or Fender guitars. The LP in this case is a sandwich body, and the sunburst has that sprayed by the blind look to it. It will never fade into beauty, and the red will always be like a fire engine and the yellow like a glowing caution light. The wiring was ok, and at least it had decent caps in it.
My buddy Cody Shaw from The Arts Music Store in Newmarket Ontario told me about a new lineup of pickups from Seymour Duncan called the Antiquity Series. You can learn about them here. After doing my research, I decided that it was likely worth trying them to see if I could make my first Les Paul pleasant to play. I went with the Antiquity Humbucker set. I had them installed by the guitar tech at The Arts whose name is Kevin. I had been interested in being able to coil tap but I learned that the Antiquity line is what they say. They are two wire units. Kevin also discovered that to fit the Antiquities he would need to do some routing to clean up the openings made by the original owner, likely with a big screwdriver or something like it. He also did what is called the 50s wiring for the pickups as you can learn about in this article from Seymour Duncan’s site.
When the guitar was finally done, I brought it home and plugged it in. For most of my ownership, the guitar had either been played through my first cheap amp, an assortment of solid staters that never lasted and finally a late 70s Marshall Custom Super Lead with a Digitech 2112 in front. Now I was going direct and played the guitar through a variety of amps. The big Marshall is a bit loud as is my half stack Silver Jubilee. While I have amps from PRS, Vox and Koch, my schedule means that a lot of my playing time is after dinner and later on so I have added a Blackstar HT-5 to my kit because it sounds good at either 0.5 watts or 5 watts.
The Les Paul with the Antiquities is a completely different guitar. It is far more open than it was with a nice warmth that is never thick or muddy. I’ve always liked the neck on this guitar and after I got it back, I could tell that Kevin had done a proper setup on it. Equipped with new D’Addario NYXL strings, the old beast is singing beautifully again. I’ve moved away from multi-effectors and am back to plain old pedal boards separating pedals to go in front of the amp and to go through Send/Return if the amp has such a thing. The big Marshall does not and neither does the PRS so a bit of cable dancing remains a requirement.
The Antiquities have an aged finish, vaguely like the NOS look. I’m not a fan of relic processes or fake aging but I can live with the look of these guys because it doesn’t look obviously faked. The sound is what matters, and these are great pickups. The bridge and neck pickups are different, with the bridge wound a bit hotter, but not in a way that detracts from the vintage tone. I’ve only played the guitar through amps with a tube based preamp so far and am very happy.
I’ve since learned that Seymour Duncan has a version for the bridge of the Jazzmaster and I may think about doing that one for my reissue at some point. They also have Antiquities in the JB/Jazz set as well as for Strats and Teles. The Tele 55 options look like they might fit my ‘50s Fender Japan Tele. I’ve also got a really nice Mex Strat that might benefit from the Antiquity II Surfer set. Ahh guitar upgrades!
REVIEW : ThorpyFX The Dane
I first encountered the idea of The Dane watching Anderton’s TV. The product was created by Adrian Thorp for Peter Honere aka Danish Pete. The Dane is similar in concept to a number of dual purpose pedals having both a boost and an overdrive section.
The big challenge for me is to find a combo unit that delivers a clean boost, that doesn’t immediately push the amp into an overdriven sound. In my mind a proper boost just gives volume, but without introducing harmonic distortions or otherwise colouring the tone. The higher the output from your pickups, the harder this appears to be to achieve. Even dedicated boost pedals seem to struggle with this. Funny enough my old Radial Booster did a really good job but had no controls, so you just got one level of boost and that was not enough control for me. So I went looking for alternatives, tried a bunch, bought a few, but nothing really did it for me until…The Dane.
As I live in Canada, and The Dane is what is called a boutique pedal, I was very pleased to discover a Canadian company that specializes in boutique pedals. It is called Electric Mojo Guitars and my contact there is a very nice fellow by name of Charles Cote. They have a store on Amazon and also sell via their own online store. I have to say that the experience of dealing with these folks has been stellar. I've had follow-on conversations with Charles on other topics and he is always extremely responsive.
The Dane is marketed as a mild overdrive with boost. The boost is very clean, but you will have to work with the settings to keep it clean with your amp. It does a lovely job into my Vox AC30 or the PRS Dallas. Into a Marshall Custom Super Lead or Silver Jubilee, it is less effective at staying clean, because those amps like to leap to overdriven tones pretty quickly. The Koch Multitone, handles the boost quite well. My practice Blackstar HT-5 is in the middle between the Vox and the Silver Jubilee. i like a boost that opens up the tone, not one that compresses it. The Dane does a terrific job at this. It’s now occupying a permanent slot in my Vox pedal board.
The overdrive is, in my opinion, lovely. There’s a really nice voice to it, with some great harmonic overtones. On an amp with good headroom, it opens up things really nicely. I am not a fan of distortion or fuzz personally, and The Dane gives a great tone, when engaged into a naturally clean amp. Using The Dane into an amp that happily overdrives even on the normal channel is a nice exercise in sustain creation. By manipulating the controls, you get beautiful tone, that doesn’t get squished and doesn’t get that edge that hurts your teeth. In my opinion, it’s better into a naturally clean amp. I wish I had a HiWatt to try it in as I suspect it would be great. The Dane is all solid state, but produces a sound that I would say is similar to using the Radial Tonebone unit into the clean channel of a Mesa Boogie. You get all the overdrive sound, without compromising individual note tone.
Backing off the guitar volume control cleans things up very nicely. While some units allow you to put the Boost either in front of or after the Overdrive, The Dane fixes the order as Boost -> Overdrive. I have other pedals that allow flipping such as the Keeley D&M which I also own and will review on its own, but for my specific use cases The Dane does precisely what I want the way I would like it done.
I like the Vox best with single coils or low output humbuckers. I recently acquired a Fender Custom Shop ’67 Telecaster Relic and its pickups sound like nothing else. It’s brighter and janglier than my other Telecasters and when paired with the Vox it’s just a treat. Having The Dane in the chain in front of the amp, I can push the Vox a little bit with the boost but still play at liveable volume with the overdrive engaged. I like the idea of the mild overdrive as it adds sustain and a bit of grit, especially with the neck pickup and doesn’t get muddy or bassy.
You can buy ThorpyFX products online from their store and they do ship to Canada. I found mine via a dealer in Quebec who has a presence on the Amazon.ca marketplace. Delivery was fast, price was good, and Amazon eliminates a lot of hassles when things don’t work out.
I do have one complaint. I find that I have had to memorize which knob is which, because the engraved labels on the stainless steel facing are nearly impossible for me to read even in decent light. This may be just me and my aging eyes, but if I were playing on a dark stage, (I’m not) this could be a hassle.
Highly recommended!