Building a Pedalboard

Relax! This is just an example of how fancy a board unit can get. Well over 1200 Euros with nothing on it. The Mission pedal and GigRig G3 switching system are NOT included. My article will get you in excellent shape for a LOT less.
Reader, listener and friend David challenges me again, this time to write an article on building your first pedalboard. He wanted to know what to consider in terms of function, what pedals were general recommendations in terms of function, what order to put them in and what other considerations go into building a pedal board. He also wanted to know if one pedal board was all that was needed for all electric and acoustic guitars with pickups.
I am pleased to so, especially since I haven’t thought about starting from zero in a very long time.
The Pedalboard Itself

Pedaltrain XD24. Buy bigger than you think you need. Because you will need bigger than you initially think.
You need a place to put your pedals. To make a good choice, it’s important to think about how you will use your pedalboard. Will you use it solely at home, or does it need to be sufficiently portable that you can take it to jam sessions, or small gigs, or on a big tour. Weight and durability is a big deal as a board that is too heavy is a pain and a board that is too flimsy is going to cause all manner of frustration. There are many makers of pedalboards now, unlike when I started out and made mine from ½’ plywood with hinged tops and a plethora of holes for cables. Moreover, in today’s world, battery powered pedals are less common, which in my mind is a good thing because batteries die and will go dead if you leave cables connected to battery powered pedals. There are very fancy boards like the Schmidt Array stuff popular in the UK and Europe (really nice but very expensive) to rail type systems from D’Addario and Pedaltrain. A quick survey of my own world reveals enough Pedaltrain gear that I should now own a piece of the company.
Rail based boards are sturdy, convenient and allow easy modification of pedal order. They tend to be inclined for easier access and thus will have space to mount a power supply to the underside of the board. A power supply is a critical element as you want to avoid power cabling that uses daisy chaining. That model is inexpensive but is prone to electrical noise and may not deliver sufficient voltage or amperage that your pedals require. Deciding on the size of the board depends on the number of pedals that you will have. There are folks who eschew pedals completely and that’s cool, but this article is not for them.
Pedal Types and Common Run Order
First question is whether your amp has a foot switch setup for channel switching. If it does and you use it, you need to allow space on the board for this. Some amp switchers have the cable permanently attached, but the better ones can be disconnected at the pedal to make transportation easier.
Tuner

The first pedal that I will recommend is a tuner. Pick a tuner that offers both true bypass and buffered bypass because some pedals down the chain may object to buffers. Keep it simple and focus on how easy it is to read and to use while you are standing. A tiny tuner that you cannot read while standing is pointless. A tuner should have a built in mute function and should also be able to be connected independent of the rest of the chain if you use a volume pedal with a tuner out. I have tried numerous tuners, some that were complete crap like the Amazon Basics one, a couple that looked ok but produce a lot of extra noise, like some Boss tuners and have gravitated to the same brand that I use on the bench in my shop. I advocate the Peterson stomp style tuners. They are not the cheapest in the world but easy to read from a distance, highly legible without being blindingly bright and come in both standard and mini sizes.
Looper

My next recommendation is best suited to solo players and a board that you will use while practicing and that is a looper pedal. You can get very powerful loopers such as the RC-10 from Boss that can also play backing loops, or something simple to use that only has loops that you create yourself. The TC Electronic Ditto+ is my recommendation. It is mini sized with a large easy to read display and a very short learning curve. To see a terrific example of how a looper can empower a single musician, use your search engine to find videos on how KT Tunstall uses loopers to create the entire band experience for her song “Black Horse and the Cherry Tree”.
Compressor
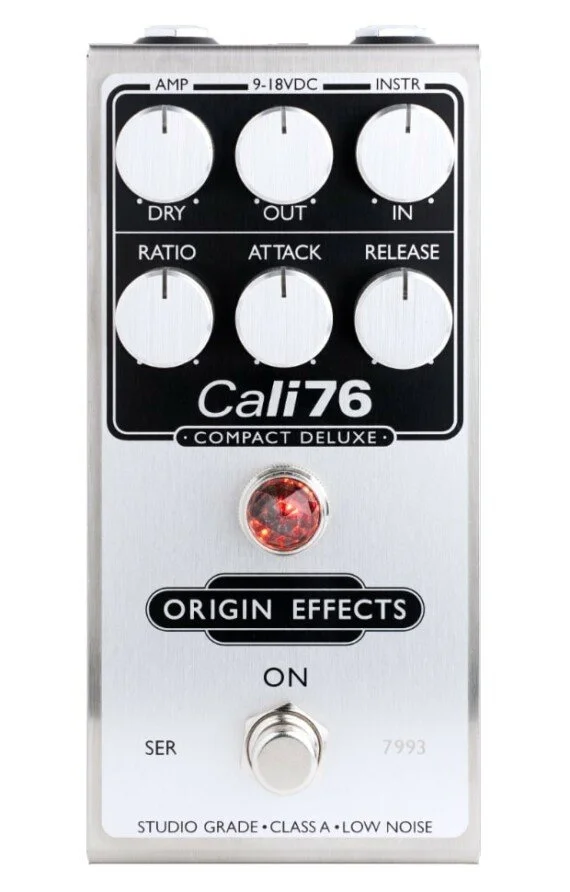
If I am not trying to overdrive the front end of the amplifier, I always use a compressor. There are tons of really crappy compressors and a few good ones. Sadly Diamond Pedals is no more because the Diamond Compressor used an optical circuit like the studio standard Teletronix LA-2A and is very hard to beat. A good compressor is invisible to the ear until it’s gone. For my purposes. I have found the Origin Systems Cali-76 to be the most versatile, with great subtly and none of the ugly squishiness of cheap compressors. The Cali-76 is based on the UREI 1176 studio compressor. My second recommendation will be the Strymon Compadre. It offers both studio and squish compressor options and on the other side includes a clean boost. It is a superb sounding pedal. In my acoustic electric article I mentioned the Empress Effects Compressor Mk II. I like it most for acoustic electrics but it does a good job on electric guitars as well.
Overdrive

Presuming that you are not using channel switching on an amp, most folks like to set the amp up to a good clean tone and push the amp into overdrive using a pedal. There are about a million overdrive pedals out there and what you like may differ dramatically from what I like. On many pro pedal boards there may be more than one overdrive pedal to do what is known as gain staging. If you can only get one pedal, I am going to propose the Browne Amplification Protein, that contains two separate and stageable overdrives, the first an implementation of the Nobels ODR-1 and the second an implementation of the original Marshall Bluesbreaker. It’s an excellent tool and provides a wide palette of tonal capability. If you want to emulate the sound of the famous and infamous Klon, get a Wampler Tumnus and you are set.
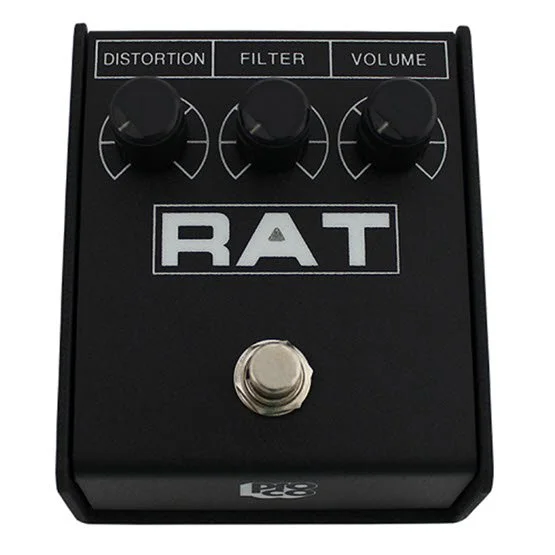
If your style of music needs more distortion from time to time, that’s the next pedal. A ProCo RAT is inexpensive and sounds amazing. There are more expensive versions of the RAT like the excellent JAM Pedals Rattler if you want to spend more money for the same sound.
I am leaving both fuzz and treble boosters off the generic pedal board and will cover them separately at the end.
Modulation and Delay
Once we are out of the gain staging space, we can start to look at modulation or time based effects. These fall into three primary categories. Modulation includes chorus, flanging and phase shifting as well as some rather esoteric effects that you may like for a song or two but are not general use pedals.
Flanger

Flanging is the reproduction of slowing down a tape reel during playback. At low settings it produces a very nice subtle widening effect and cranked up you get a whoosh sound. Consider Heart’s “Barracuda” as a good example of flanger effects. The rerelease of the EHx Electric Mistress is still popular but I like a flanger that can do subtle really nicely. In a dedicated flanger pedal, my go to is the Strymon Orbit. It is a bucket brigade design like the Electric Mistress but is better built and is much quieter from a signal to noise perspective in my experience. You may hear that flangers and phase shifters are like devices. This is not true.
Phase Shifter
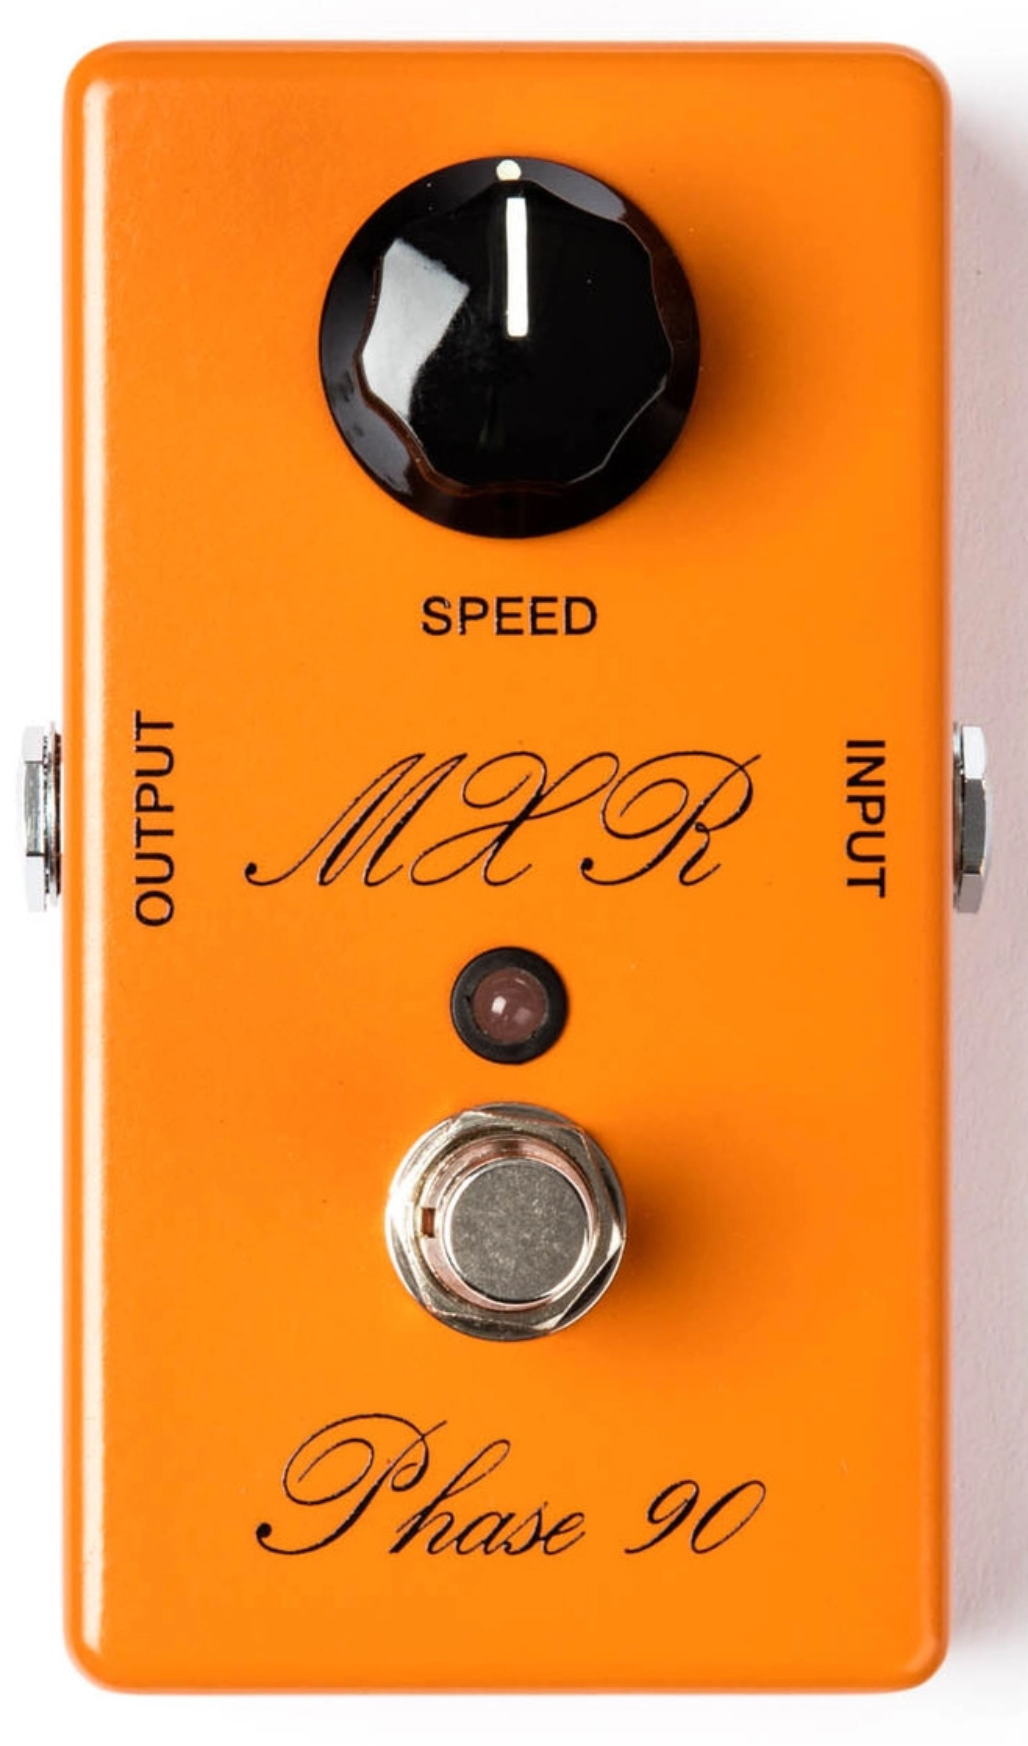
Phase shifters were very popular before flanging took over pedal boards. There are many phase shifters out there, but if you like the sound of early Van Halen, or early seventies classic rock, you cannot go wrong with an MXR Phase 90. It was the go to phase shifter for years, although there were other phasers that were popular in the day such as the large Mutron BiPhase. If you like the sound of a phase shifter but want more flexibility, look to the Strymon Zelzah which can also deliver flanger and chorus sounds.
Chorus
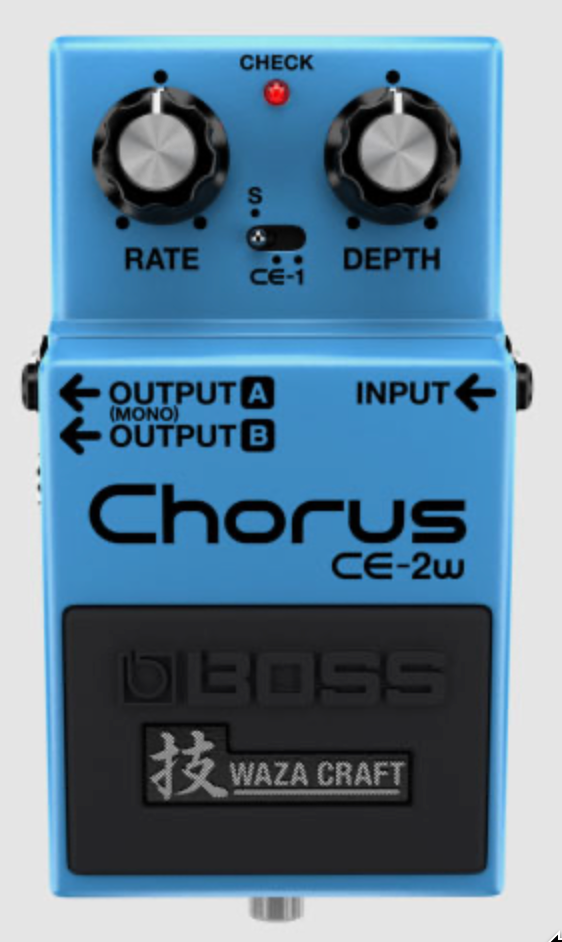
A chorus pedal is the sound of the eighties. In fact chorus was used so much in that decade many people avoided the sound because it was everywhere. Chorus also works very well on bass when used at a subtle level. For a really nice very flexible chorus pedal look at the BOSS CE-2w, the Waze Craft release of the CE-2. It is a really nice chorus pedal with great sound options. I also like very much the BOSS DC-2w Waze Craft implementation of the old BOSS Dimension C rack effect. As Chorus is not all that far from Vibrato, the Strymon Ola can do both if you wish.
Of course there are multi-modulation pedals. I have tried a lot of them and get frustrated with the complexity of all the knobs. You really do have to memorize the layouts and different secondary functions. One that I did try and kept in the interest of pedal board real estate is the Wampler Terraform.
As I mentioned, there are numerous other modulation effects, but as they tend to get very specific, I do not see them on general use pedal boards.
Delay Effects
Next up in the chain are the delay pedals. Delays basically emulate one or more of the four principle classic delay types. Many pedals strive to deliver the sound of multiple delay types in a single pedal. Sometimes this works, and a lot of the time, it’s a case of many almost but not quite results. I will list some multi delays that I like at the end of this section.
Drum Type Delay

The drum style delay is a very old and classic design used often by David Gilmour of Pink Floyd. It is a rotating drum with a single record head and four equally spaced playback heads. The design is best epitomized by the Binson Echorec. While bulky and not fond of being bumped around, the Echorec was a thing unto itself where you could select which playback heads were in use in any combination of the four. The Dawner Prince Boonar is a superb pedal that gives the sound of the Echorec without any of the downsides. The only awkward thing about it is that it is horizontally laid out instead of vertically. For me, I don’t care because the sound of it is so excellent. Another great choice in this space is the Strymon Volante, which in addition to drum delay also does a very fine tape delay. At NAMM 2023 T-Rex Effects introduced their take on a real drum delay that they call the Binson Echorec (they must have bought the name). It is expensive at over $2K but I am indeed impressed.
Tape Delay

Tape delay is the oldest method of creating delay other than reverb in a really enormous space. Les Paul spent a lot of time on this in his garage studio in California. The Maestro Echoplex and the Roland Space Echo were big bulky and awesome sounding tape delays that used a loop of tape and a moveable playback head or heads to get the delay sound. As the tape aged and the capstans aged, there came a less bright sound with more mechanical artefacts that people loved. Today’s tape delays may provide tape aging and wow / flutter controls to emulate the sound of real tape. While I tend towards drum delays myself, a good tape delay is very valuable. Wampler’s Tape Echo is a terrific inexpensive emulation of tape. BOSS’s recent RE-202 is a representation of the original RE-201 tape echo. If I can only have one tape delay style pedal, I will choose the Strymon El Capistan. I preferred it over BOSS’ excellent RE-202. As noted earlier Strymon’s Volante combines drum delay and tape delay in a single pedal. For convenience of both great delays in one box, it’s hard to beat. If you want real tape, Echofix out of Australia does a lovely unit and T-Rex Effects has the excellent Replicator D’Luxe.
Analog Delay

Analog delay is based on the original Electro Harmonic Memory Man that used a specific chip type called a bucket brigade device. I remember building a pedal from a kit back in the seventies, but I never liked it. Some players really favour this sound. The Electro Harmonic Memory Man family still exists and that is an option. MXR’s Carbon Copy Deluxe is a nice simple analog delay with very good sound in a small and relatively inexpensive package. I also recommend the BOSS DM-2w Waza Craft Analog Delay. Keep it simple rather than knob hell and you will be happier.
Digital Delay

Digital Delays are pristine and can last forever. Eventide brought this technology to global stages back in the seventies. Today digital delay is widely available as DSP chips are now widely available and relatively inexpensive. Some people do not care for the sound of digital delay while others really like it, so it is as always a personal choice. The Strymon DIG is a very good digital delay pedal that really sounds like those vintage digital units. For the money, it is very hard to beat BOSS’ excellent DD-8 Digital Delay. Its only downside is the lack of a tap tempo function although you can use a simple foot switch to add this. Again, in the space of dedicated delays, simple is always better.
Combination Delay
Combination units bring multiple delay types together. I find that these units readily introduce option paralysis although the better ones bring the tones along with the complexity. In this space the Strymon Timeline is a killer choice. The learning curve is quite long, but it really does everything. Another great sounding choice is the Eventide Time Factor. Again it has a longer learning curve. For a very simple to use multi-delay pedal consider the TC Electronic Flashback 2. The sounds are quite decent and you get a lot of options at a very low price point.
Reverb

Next up on the board, and the last general pedal type is the reverb pedal. Many amps have reverb built in so why a reverb pedal? To be blunt, I find a lot of in amp reverb wanting, unless of course it is a real spring reverb with real springs. Otherwise in amp reverbs tend to leave me cold. Hence reverb pedals. You may also have an amplifier that does not have built in reverb, or again really not like the built in reverb. This is where a dedicated reverb pedal comes into play. There is a big difference between a good reverb pedal and one that you will regret and that means incurring a cost. I recommend three reverb pedals, none are inexpensive but all do an excellent job and one inexpensive reverb pedal that can most generic reverb usage. Let’s start with the TC Electronic Hall of Fame 2. This is the inexpensive option and for the dollar is the best sounding one out there. It offers a variety of reverb style and is very easy to use. Moving to what I call the top line reverbs, I am going to bypass the renowned Strymon Big Sky as while it sounds terrific, it really is an exercise in option paralysis unless you spend a lot of time learning it. I tend to recommend the Strymon Blue Sky instead. A simpler design, and much faster to get to the sound that you want although it only has three different reverb types. I also really like the Source Audio Ventris Dual Reverb. Source Audio make really high quality pedals and this one sounds fantastic. It offers the widest range of reverb options in a pedal that is still very easy to use. My final recommendation is the Universal Audio Golden Reverb. Like the others, the reverbs are awesome. The Golden Reverberator offers fewer reverb types than the Source Audio Ventris, but I personally prefer the sound of plate reverb, and the Golden Reverberator in my opinion does the best EMT-140 plate reverb available in a pedal.
Fuzz and Treble Booster

Now that we have the core out of the way, and remember, you may not need or want all of what I call the core pedals, let’s look at some special use cases. The first one I will tackle is fuzz and in fairness to all, I am really not a fuzz fan. I have found three fuzz pedals that I can tolerate and three different price points. The least expensive and very good is the Wampler Velvet Fuzz. In the middle is the very innovative Benson Germanium Fuzz and at the higher end is the tube based Effectrode Mercury which is my preferred unit. I am well aware that there are massively expensive transistor based fuzz pedals using either Germanium or Silicon transistors. Be aware that a transistor fuzz is an incredibly simple device and if the total cost of parts is $50 including the circuitry, pots, jacks and case, I will be astounded. It’s your money, spend as you wish but now what you are actually getting.

Treble boosters are best known to fans of Rory Gallagher and Brian May. The original Dallas Rangemaster remains as a reissue, but again, treble boosters are very simple devices so spending a lot on one is kind of pointless from my perspective. The Catalinbread Naga Viper is a decent inexpensive treble booster that doesn’t sound like dogshit. The Strymon Sunset dual overdrive has a treble booster that is quite good on one side, but is expensive if all you want is a treble boost. I have written about the excellent Frost Giant Yomi, but it is no longer available.
The thing to note about Fuzz pedals and Treble Boosters is that they tend to crap out if the input signal has been buffered, so they want to be first out of the pickups. Since both cannot be first and if you want both, the trying and switching of order is up to you. So plan on them being first in the chain, one of the reasons I recommend that your tuner not be in the main loop since most tuners are buffered although better ones can disable the buffer in some manner.
Vibrato and Tremolo
Vibrato pedals automate the going in and out of tune that happens with a vibrato arm, Fender not withstanding who have been calling it a tremolo incorrectly for nigh on 70 years. Never let facts get in the way of common use. The old Diamond Vibrato remains one of the most respected and the only other that I can recommend the Origin Systems Magma 57 which is an overdrive pedal that emulates the old Magnatone amplifiers with built in vibrato. Tremolo pedals vary the volume on a user set curve. Tremolo is very popular in surf music and some players really like it. It gives me a migraine and I can only recommend the Jam Pedals Harmonious Monk because my friend Mick Taylor really loves it and he and Dan helped with the initial design goals. I have old Fender amps that have excellent built in tremolo (erringly called Vibrato) if I need a headache.
There are all kinds of different modulation and delay modulation pedals in the market. While I have tried lots, when I look at my pedalboard builds (there are seven different ones right now), I haven’t put any ring modulators or pitch shifters or envelope filters or slicers or anything else on my boards because I just do not like them.
Powering This Stuff
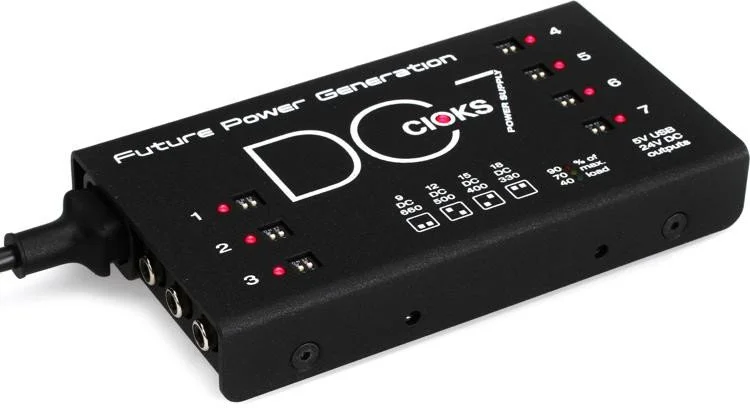
Many pedals now require external power. While there are now many different external power supplies, because many pedals are demanding in terms of both voltage and amperage (and some, like some members of the Diamond family) are centre positive and not centre negative, you do not want one of those daisy chain things. They are inexpensive and deliver 9v and 100mA ok, but to be blunt are noisy as hell. Plan a proper power supply as part of your build. I standardized a long time ago on the CIOKS brand, and recommend the DC-7 to everyone as their standard power station. You can stick it under the upper rail of a Pedaltrain board, it comes with a suitably long power cord, no wall wart and the cables on the supply end use the very reliable RCA connector. The kit includes adapters for pedals that are centre positive and for those that use mini phone type plugs instead of the more common barrel power connector. Each output on the CIOKS DC-7 is independently settable for voltage and each port can deliver enough amperage to satisfy all but the most demanding DSP based pedal. If 7 ports is not enough, you can add 4 or 8 more outputs with the CIOKS 4 and CIOKS 8 respectively. If you add on a power demanding Line 6 HX or Neural Quad Cortex, the CIOKS CRUX can be added to a DC-7 to power those demanding monsters as well. They are built tough, no plastics and hold up on professional touring rigs. Buy your last power system first and get a CIOKS DC-7.
Mounting the Pedals
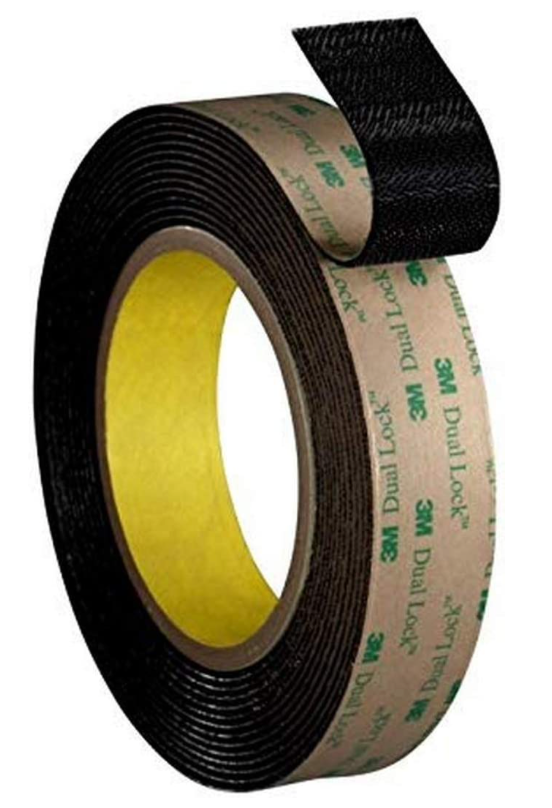
Most board systems come with two rolls of velcro. Stick the soft side (called the loop side) across all the rails and press it down. Don’t forget to save some to go under the highest rail to hold your power supply unit if you do not want to purchase the accessory mounting frame and be drilling holes in the board. Instead of using the hard side velcro (called the hook side), I recommend getting your self a spool of 3M Dual Lock Tape. Use this instead of the hook Velcro. It holds very securely and you won’t need a spatula to remove a pedal if you decide to do so. I do not suggest using Dual Lock on the rails. Once two pieces of Dual Lock hook together, the word “lock” becomes very obvious. If your pedal has rubber feet they have to come off. If the feet came in the box, no need to put them on at all. Put a small triangle of Dual Lock in each corner, press it down hard so it seats on the pedal, give it a few minutes and you are ready to stick the pedals down. I recommend laying out the pedals WITHOUT the Dual Lock so you know where everything is going to go. Then you can apply the Dual Lock to the pedals and put them in place. I cut squares of Dual Lock about an inch square because the tape is about an inch wide, then cut the squares on the diagonal to get triangles. It is these triangles that I attach to the pedals.
Cabling

In a perfect world you would make individual connecting cables to go between pedals that are just the right length. I have done this for clients who advised that they wanted the cleanest looking board possible but don’t do it on my own boards, because I am constantly changing and trying different pedals. George L’s, Evidence, BOSS, D’Addario and Crosby have cable kits. You get a spool of cable and a selection of solder-less connectors. It’s very elegant but time consuming. I tend to use the Ernie Ball Flat Ribbon cables. I buy the combo kit that includes 3 inch, 6 inch, 12 inch and 24 inch cables. It costs about $90 for one full kit and they are great cables with nice flat connectors that unlike other flat connectors that look like little pancakes, do not take up a ton of space. I bought a Mackie Cable Tester that has cut hours of futzing around when working on boards, but have never needed it with the Ernie Ball Flat Ribbon cables.
Tidying Things Up
Between the pedal cables and the power cables, the underside of the board will look like a rat’s nest. Head over to your local Walmart or whatever and get a bag of cable zip ties. Use them to tidy up the cabling underneath the board, and use some loop velcro and small loops of hook velcro to hold them in place to the underside of the rails. This way when you go to move the board or take it in and out of a gig bag or road case, the cables do not snag on anything available. Some pros even use wire number labels to indicate which power port is connected to which pedal. I confess that I do not do it, but I have seen it done and it does look very professional. Also get reusable velcro cable ties for the mains cord or cords that need to be plugged in to get the pedal board to function.
Off Board Pedals
You may be wondering why I have not mentioned Wah Wah Pedals, Volume Pedals or Expression Pedals. Some folks mount them on the main board. I do not, If there is only one I let it sit on the floor. If more than one, I make a smaller separate board just for these things because they tend to be taller and they take up a lot of real estate. I rarely use a Wah anymore, but do tend to use a Volume pedals so I can easily mute the instrument and also have a tuner output that keeps the tuner out of the pedal chain entirely. I will sometimes use an Expression pedal with a delay or modulation pedal, but typically I do not. Remember that Expression pedals are usually TRS cables not the standard TS cables that we use for everything else. There are tons of different variants out there. I use the Mission Engineering Expression Pedals and the Xotic Way and Xotic Volume Pedal. I find them more cost effective than the more fragile plastic types and I don’t have to deal with broken control strings and gunk buildup on the otherwise excellent Ernie Ball Volume pedals. A caution, don’t buy a volume pedal without a dedicated tuner out. If you do, expect disappointment in the future.
Closing
While this was a long article to create and probably to read, understand that we just took a couple of steps on a very lengthy pedal path. If you follow this guidance you will be on your way to a solid pedal platform and while more costly, dedicated pedals tend to sound better than a sings, dances, makes julienne fries digital amplifier, although one of those will be simpler to transport even if it doesn’t sound as good as a traditional amp and separate pedal board. Thanks for reading and for listening to the podcast episodes. I’m Ross Chevalier and until next time, peace.